EduTrack User Guide 📖
EduTrack is a powerful desktop app designed for SOC tutors, allowing you to streamline your teaching tasks and effortlessly track your student records. 😎
Whether you find yourself juggling the management of numerous students or simply require swift access to individual student information, EduTrack equips you with the tools to easily organize your classes.
The application is optimized for use via a Command Line Interface (CLI) while still having the benefits of a Graphical User Interface (GUI).
If you are a new user of EduTrack, click here to see the instructions on how to kickstart your EduTrack experience! 🚀
If you are an experienced user of EduTrack, click here to see a summary of commands.
Table of Contents
- Quick start
- About
- Features
- FAQ
- Known issues
- Command summary
- Glossary
Quick start
- Ensure you have
Java 11or above installed on your computer. - Download the latest
EduTrack.jarfrom here. - Copy the file to the folder you want to use as the home folder for your EduTrack.
- Open a command terminal,
cdinto the folder you placed yourEduTrack.jarfile in, and typejava -jar EduTrack.jarto run the application.
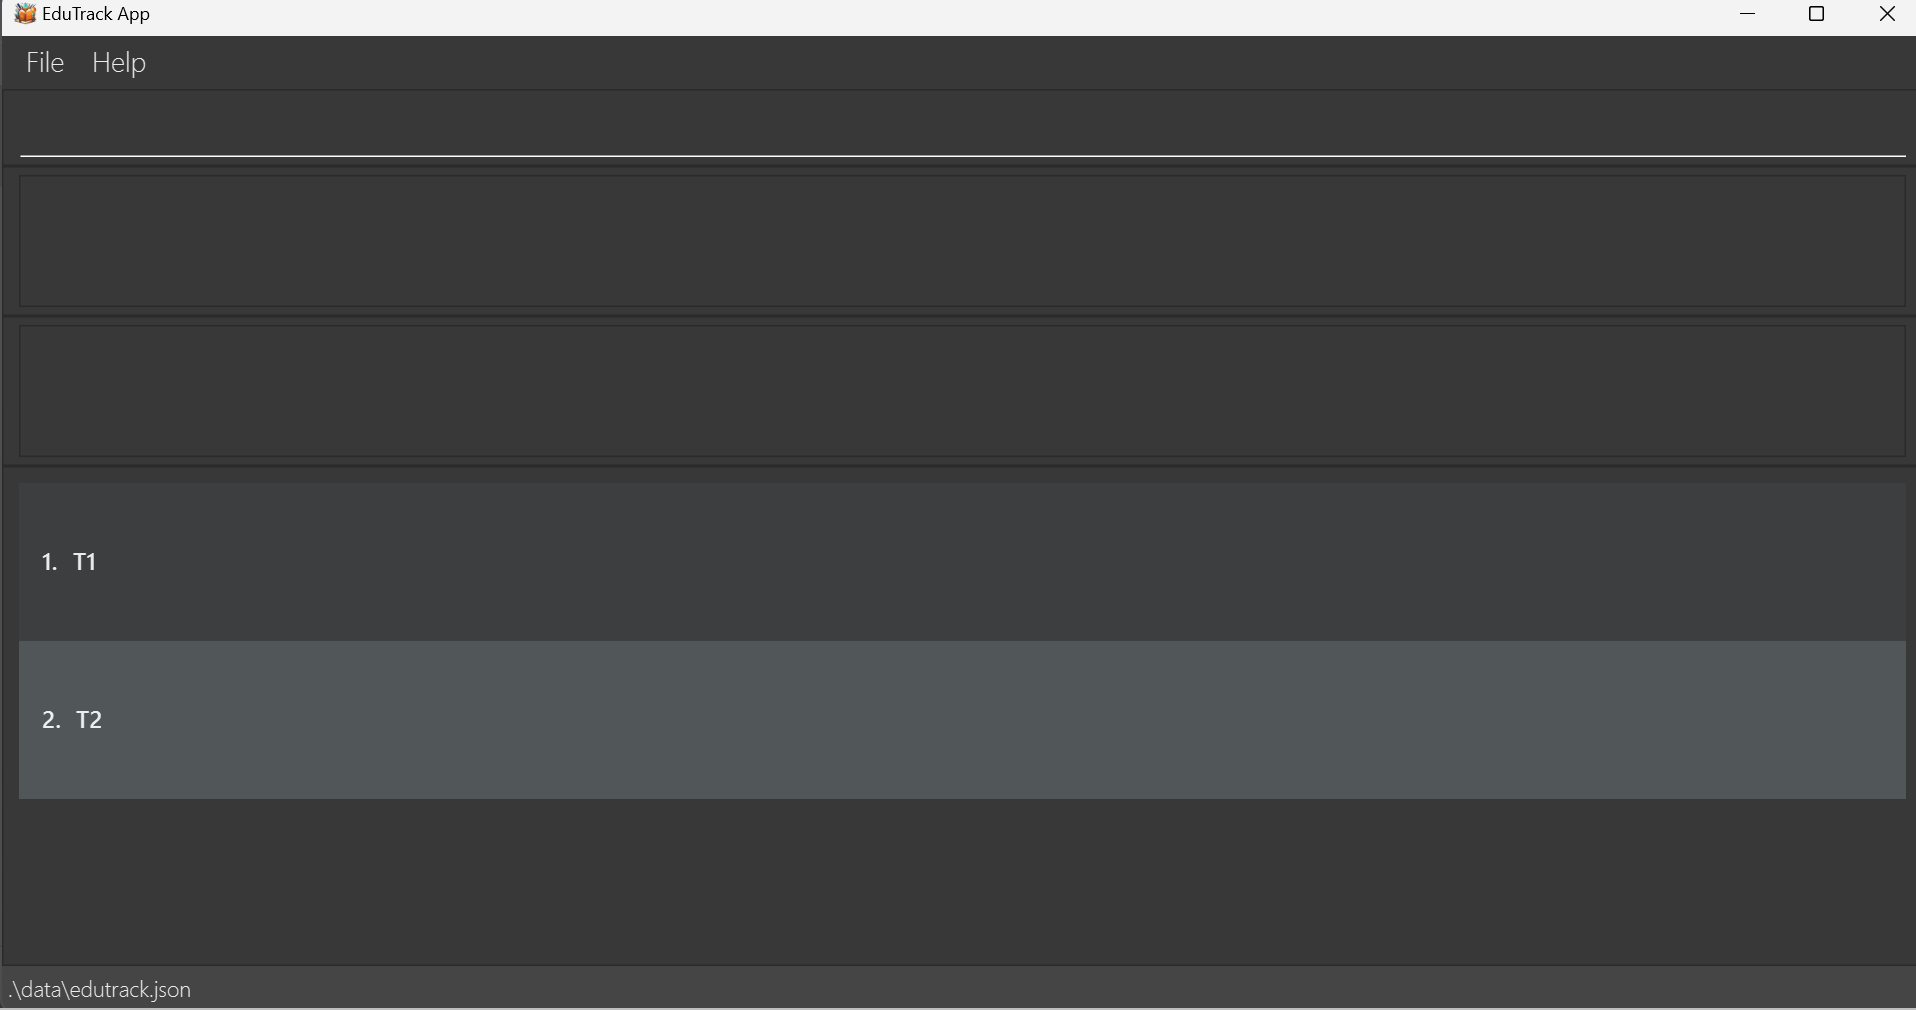
A GUI similar to the one below should appear in a few seconds. Note how the app contains some sample data. Refer to EduTrack's Graphical User Interface if you want to learn more about EduTrack's interface.
- Type the command in the command box and press
Enterto execute it. eg. typinghelpandEnteragain will open the help window.
Below are some sample commands you could try:list: Lists all classes.view /c 1: Shows the class information and all students of the first class in the class list.add /c CS2103T: Adds a class named "CS2103T" to the list of classes.add /s John /c 1: Adds a student named "John" to the first class in the class list.remove /c 1: Removes the first class in the class list.exit: Exits the app.
- Refer to the Features for more details about each command.
About
EduTrack's Graphical User Interface
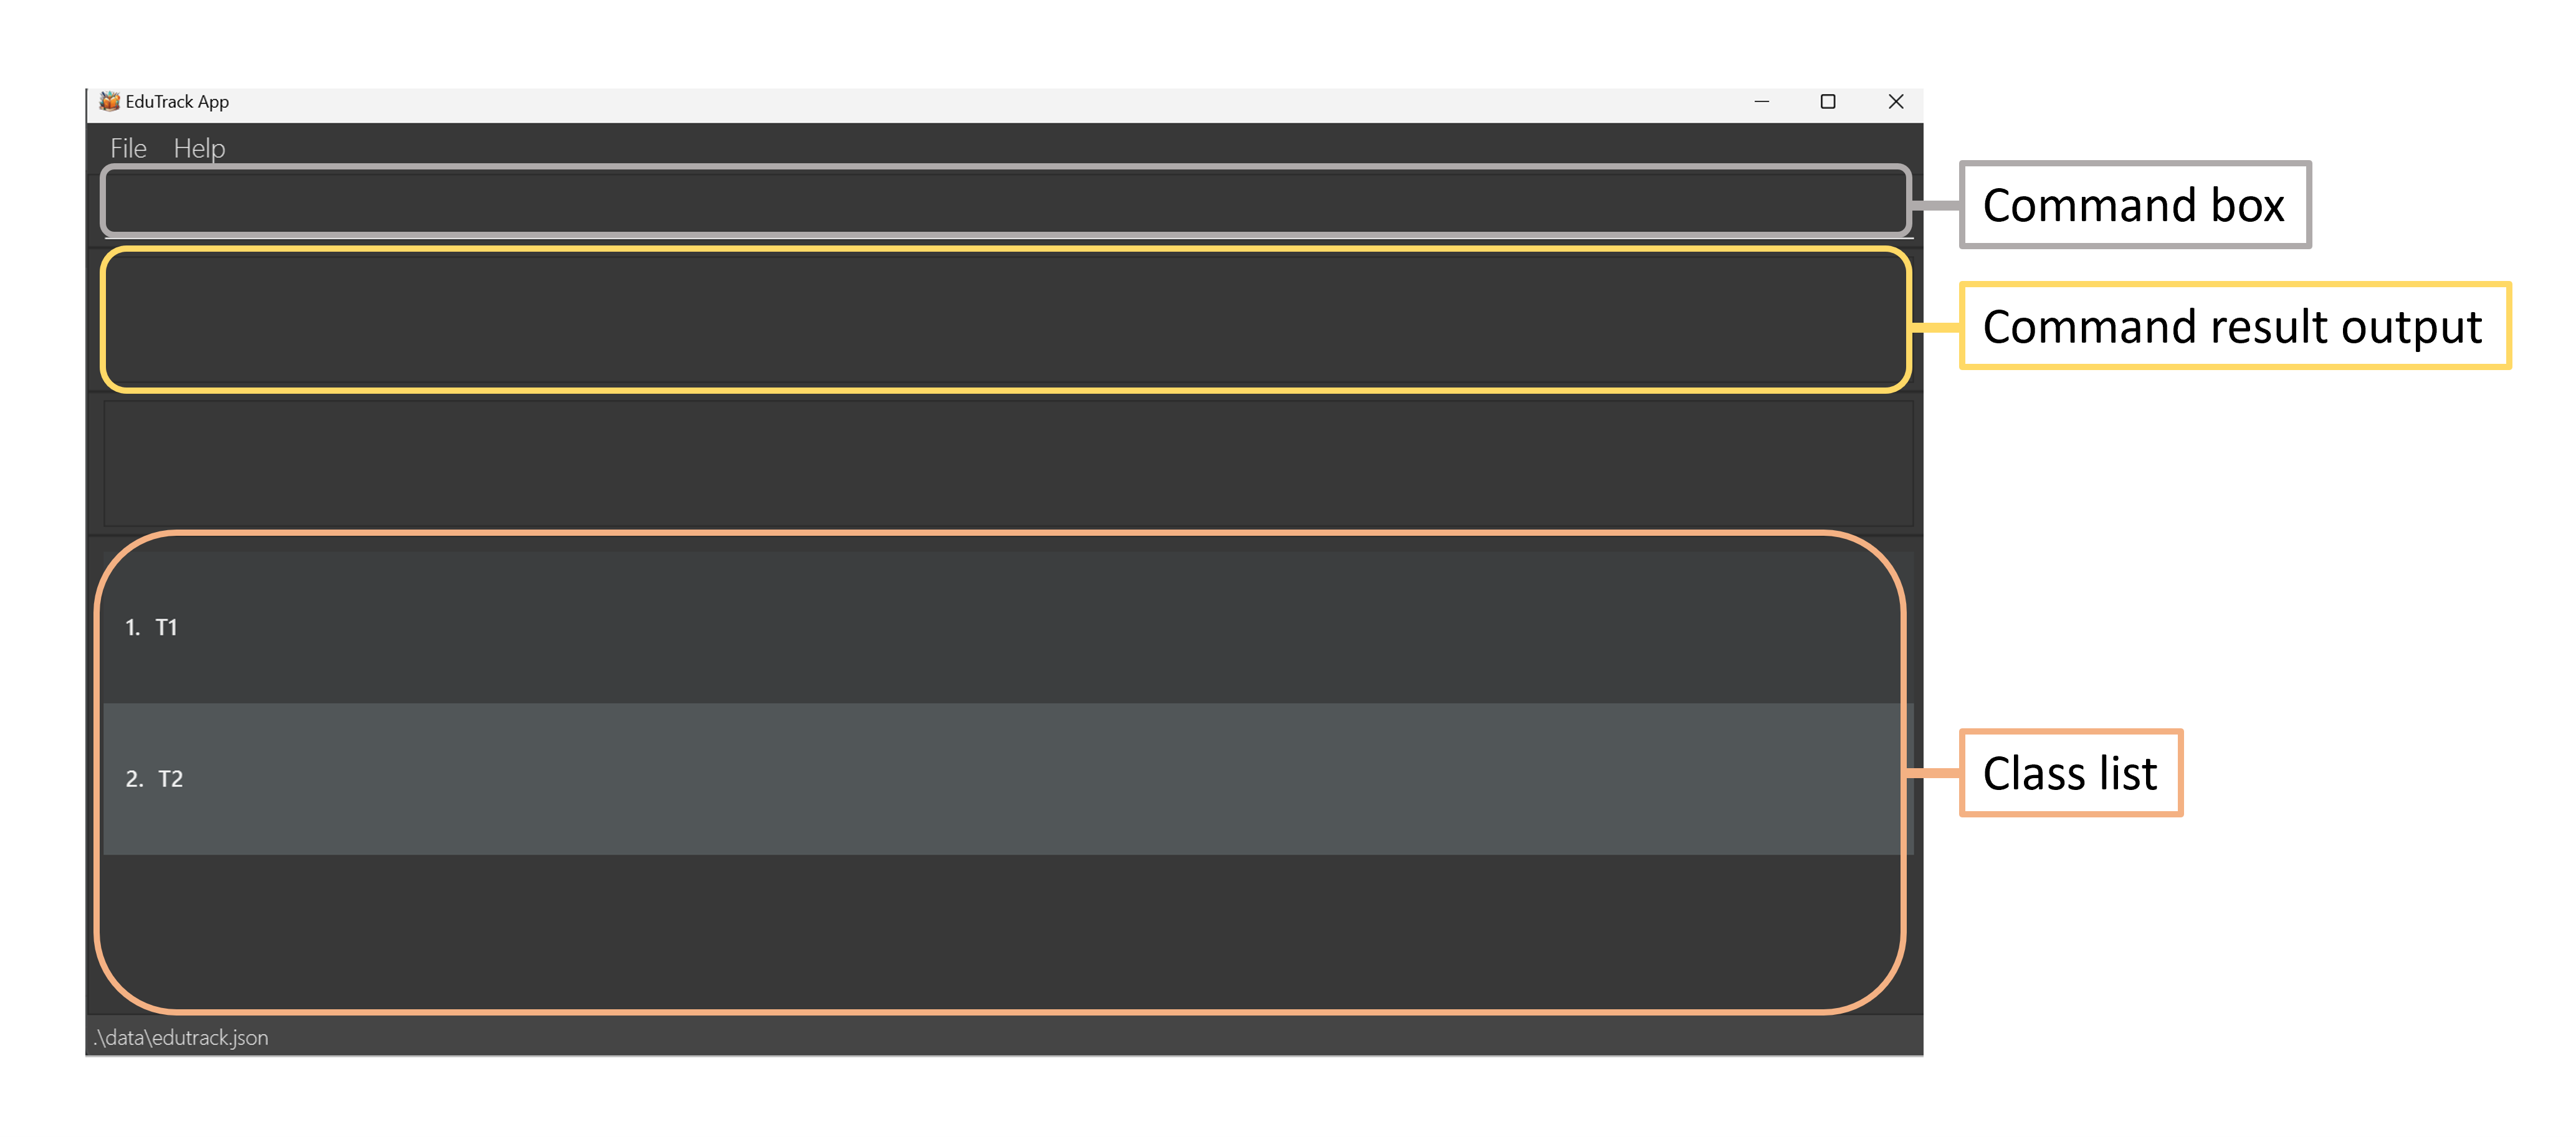
EduTrack's GUI is designed with simplicity and efficiency in mind, featuring two primary displays:
Overview of All Classes
- Command box: Where you can enter the commands.
- Command result output: The resulting message will be shown here.
- Class list: Displays the list of all your classes.
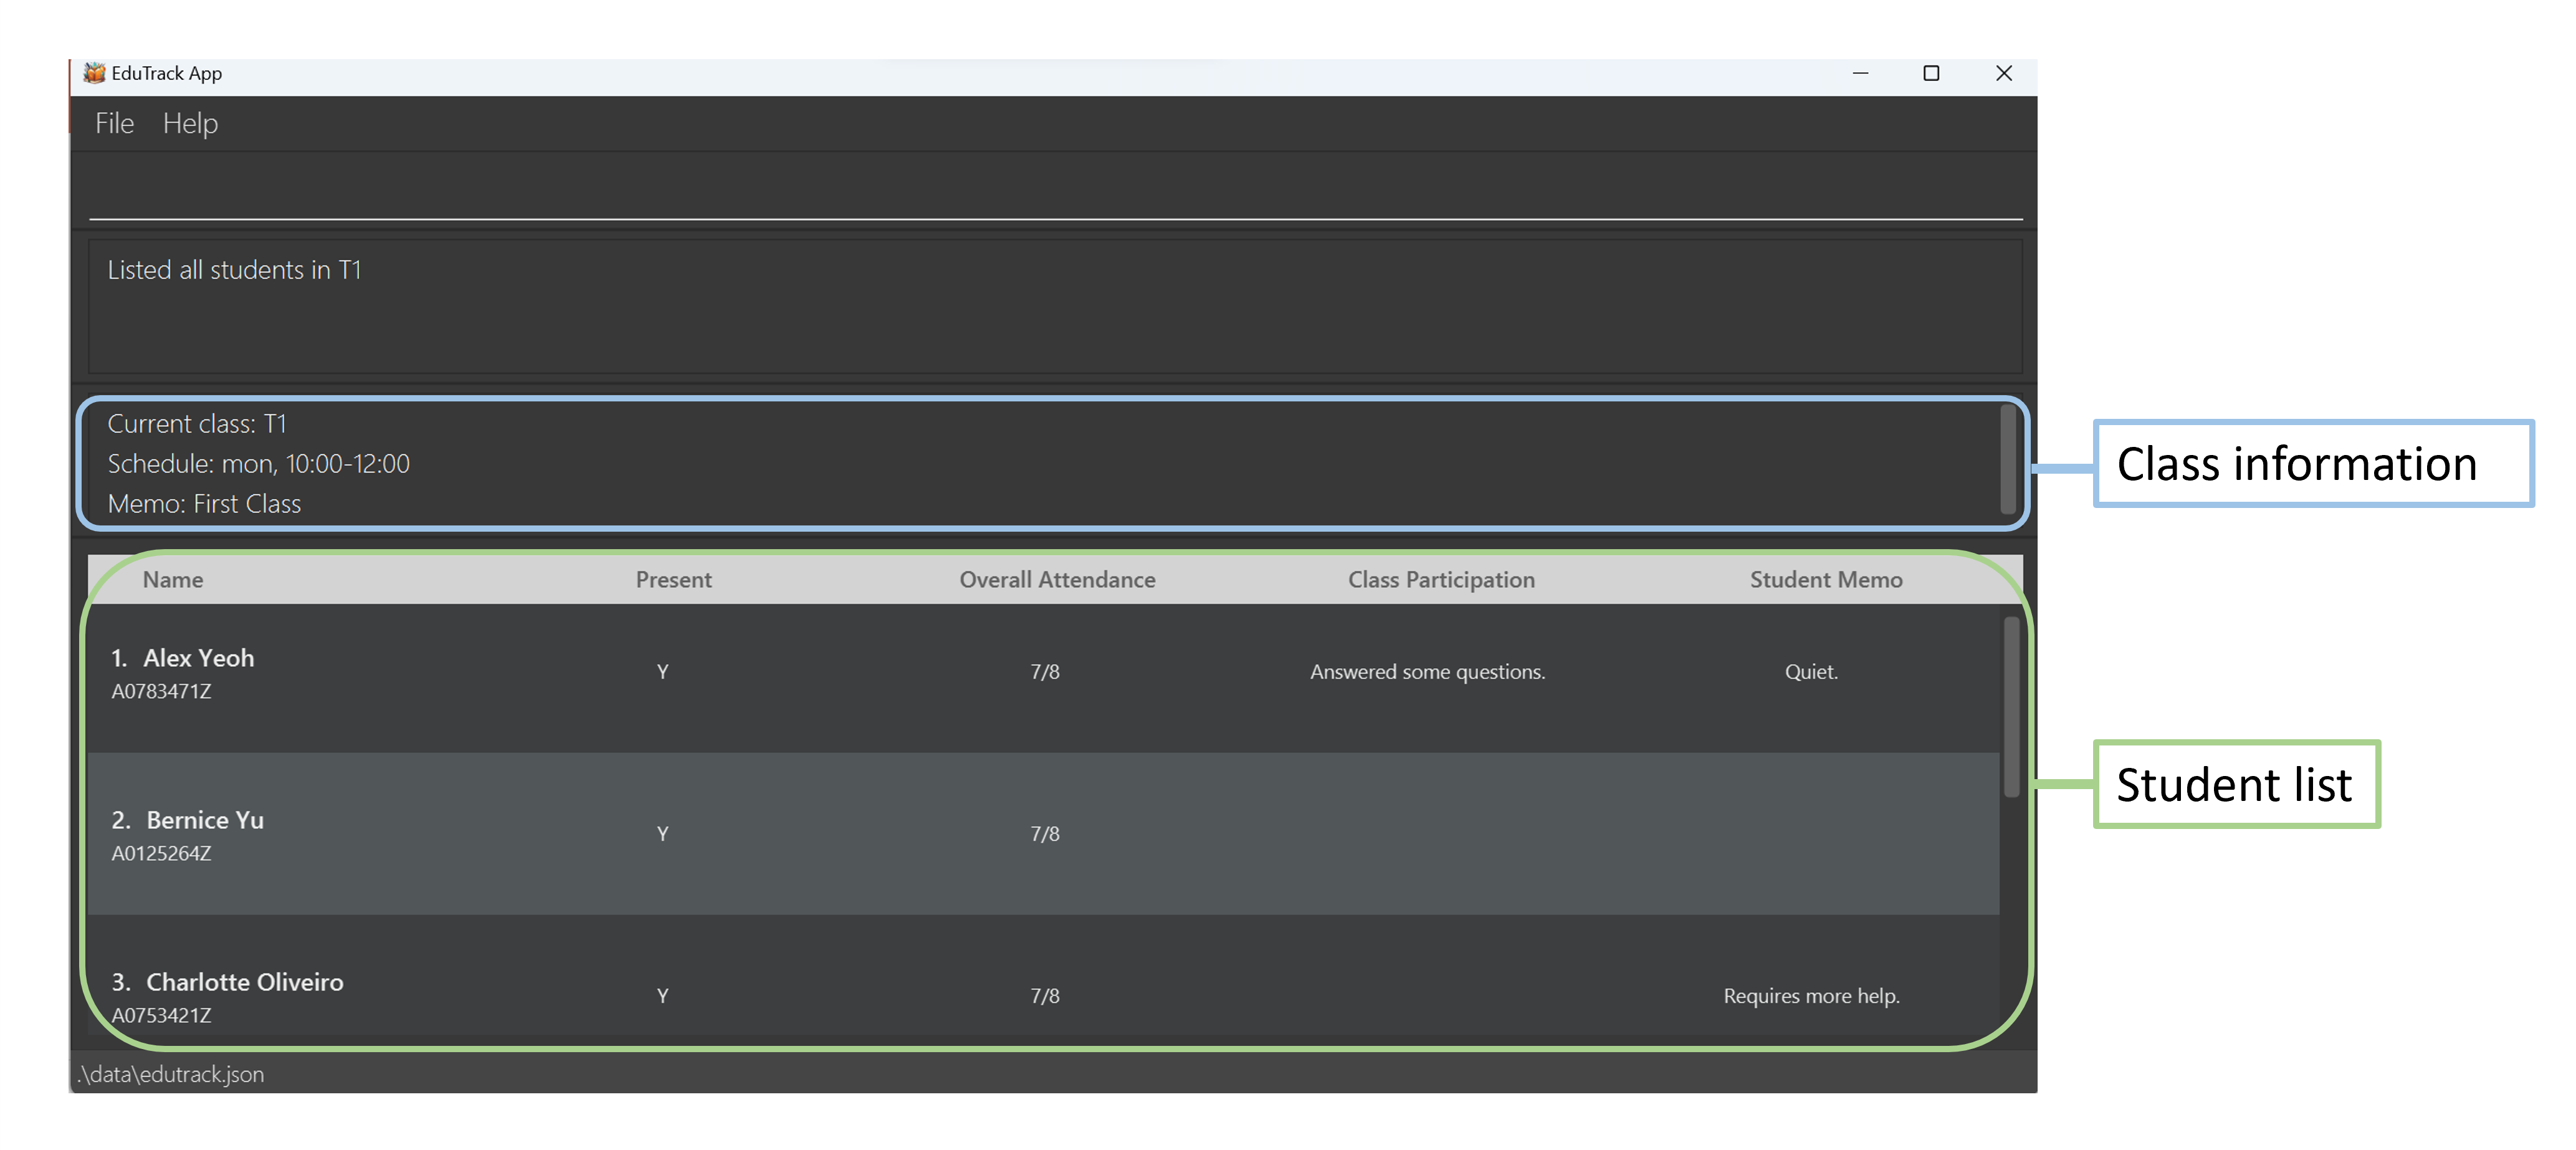
Overview of A Specific Class
- Class information: Displays the details of your selected class.
- Student list: Displays the list of all students in your selected class.
Information:
The GUI will refresh upon any changes to the class list or student list.
If changes are made to a student or class information of another class while you are viewing a class, the GUI will update to show you the other class' students and class information.
Structure of This User Guide
We understand that reading a new user guide can be overwhelming. That is why our user guide is structured to help you quickly and easily find the information you need. You can refer to the Table of Contents to jump to various sections of this user guide.
In the following subsection, you can find several tips that could be beneficial when reading this guide. The next section documents the main features that EduTrack offers and provides you with instructions on how to use them!
Reading This User Guide
In this section, you will be provided with essential information to help you understand this user guide effectively.
Common icons
These are the common icons you will encounter throughout this user guide.
Additional Information
The text displayed in an information box indicates additional details that you might find useful to know while using the commands.
Information: Example additional information.
Caution
The text displayed in a caution box indicates what should be followed carefully; otherwise, unintended consequences might arise.
Caution: Example warning.
Tip
The text displayed in a tip box indicates handy tips to enhance your user experience with EduTrack.
Tip: Example tip.
Common terms
These are the common terms you will encounter throughout this user guide.
| Terms | Meaning |
|---|---|
| Command | The instruction you enter into command box of the application. |
| Parameter | The additional information you provide alongside the command. |
Command format
Words in
UPPER_CASEare compulsory parameters to be supplied.E.g., you are to provide the
CLASS_NAMEinadd /c CLASS_NAMEcommand.Words in
UPPER_CASEenclosed in square brackets are optional parameters.E.g., you can choose to provide
CLASS_NAME,MEMO, and/orSCHEDULEin theedit /c CLASS_INDEX [/n CLASS_NAME] [/m MEMO] [/t SCHEDULE]command.Optional parameters can be in any order.
E.g., if the command specifies
[/n CLASS_NAME] [/m MEMO], you can choose to provide them in the following order:[/m MEMO] [/n CLASS_NAME].Extraneous parameters for commands that do not take in parameters (such as
help,list,exitandclear) will be ignored.E.g., the command
help 123, will be interpreted ashelp.If you are using a PDF version of this document, be careful when copying and pasting commands that span multiple lines as space characters surrounding line breaks may be omitted when copied over to the application.
Command parameters
Most commands in EduTrack require various parameters. You can find their constraints in the table below:
| Parameters | Constraints |
|---|---|
CLASS_NAME | A single-word string consists of any characters and is not case-sensitive. When CLASS_NAME is displayed on the screen, it will always be in uppercase. |
CLASS_INDEX | A valid positive integer shown in displayed class list. |
STUDENT_NAME | A string consisting of alphanumeric characters. |
STUDENT_INDEX | A valid positive integer shown in displayed student list. |
MEMO, PARTICIPATION | A string consisting of any characters. |
SCHEDULE | A string that follows the format day, HH:MM-HH:MM: - day can be one of the following options: "mon", "tue", "wed", "thu", "fri" - HH:MM-HH:MM signifies a 24-hour clock format, where the start time must be earlier than the end time. |
ID | A string that starts with "A", followed by only numerical characters (0-9) and ends with a single capitalised alphabet (A-Z). |
NUMBER_OF_LESSONS | A non-negative integer. |
⬆️ Return to Table of Contents
Features
The features are broken down into the following subsections:
Tip:
- We highly recommend you read the Command format and Command parameters sections to understand their constraints before using our features.
Class commands 🏫
Listing all classes : list
Shows an overview of all your existing classes. You will be able to have a concise view of all the classes you are currently teaching.
Command Format: list
Adding a class : add /c
Adds a new class to your list of classes. You can manage multiple classes at once with this feature.
Command Format: add /c CLASS_NAME
Examples:
add /c cs2103t: Adds a new class named "CS2103T".add /c st2334: Adds a new class named "ST2334".
Sample Usage:
- Assuming you want to add a new class named "CS2103T".
- Enter the following command:
add /c cs2103t
- The result box will display the following message:
CS2103T has been added
- You have successfully added the class. 🎉
Caution:
- The
CLASS_NAMEprovided must be unique, meaning that two classes with the sameCLASS_NAMEcannot coexist in EduTrack.
Removing a class : remove /c
Removes an existing class from your list of classes.
Command Format: remove /c CLASS_INDEX
Examples:
remove /c 1: Removes the first class in your class list.remove /c 2: Removes the second class in your class list.
Sample Usage:
- Assuming you want to remove the third class named "CS2103T-T15-3" in the class list.
- Enter the following command:
remove /c 3
- The result box will display the following message:
Deleted Class: CS2103T-T15-3
- You have successfully removed the class. 🎉
Viewing a class : view /c
Shows you detailed information (class name, class schedule, enrolled student list) about a class on the GUI. You will be able to have an overview of all the information you need to manage and edit your class and student information.
Command Format: view /c CLASS_INDEX
Examples:
view /c 1: Shows information of your first class in the class list.view /c 2: Shows information of your second class in the class list.
Sample Usage:
- Assuming you want to view the fifth class in the class list.
- Enter the following command:
view /c 5
- The result box will display the following message:
Listed all students in CS2103T-T15-3
- You have successfully viewed the class. 🎉
Editing a class : edit /c
Edits your class information at the specified index. You can update the name of your class, memo, and schedule. This helps to keep your class information up-to-date.
Command Format: edit /c CLASS_INDEX [/n CLASS_NAME] [/m MEMO] [/t SCHEDULE]
Examples:
edit /c 1 /n cs2100: Edits the name of your class to "CS2100".edit /c 1 /m submit attendance report /n cs2100: Edits the name of your class to "CS2100" and its memo to "submit attendance report".edit /c 1 /t mon, 10:00-12:00 /m: Edits the schedule of your class to "mon, 10:00-12:00" and removes its memo.
Sample Usage:
- Assuming you want to edit the name of the second class to "CS2040S".
- You can enter
view /c 2to see what your original class looks like, as shown below:
- Enter the following command:
edit /c 2 /n cs2040s
- The result box will display the following message:
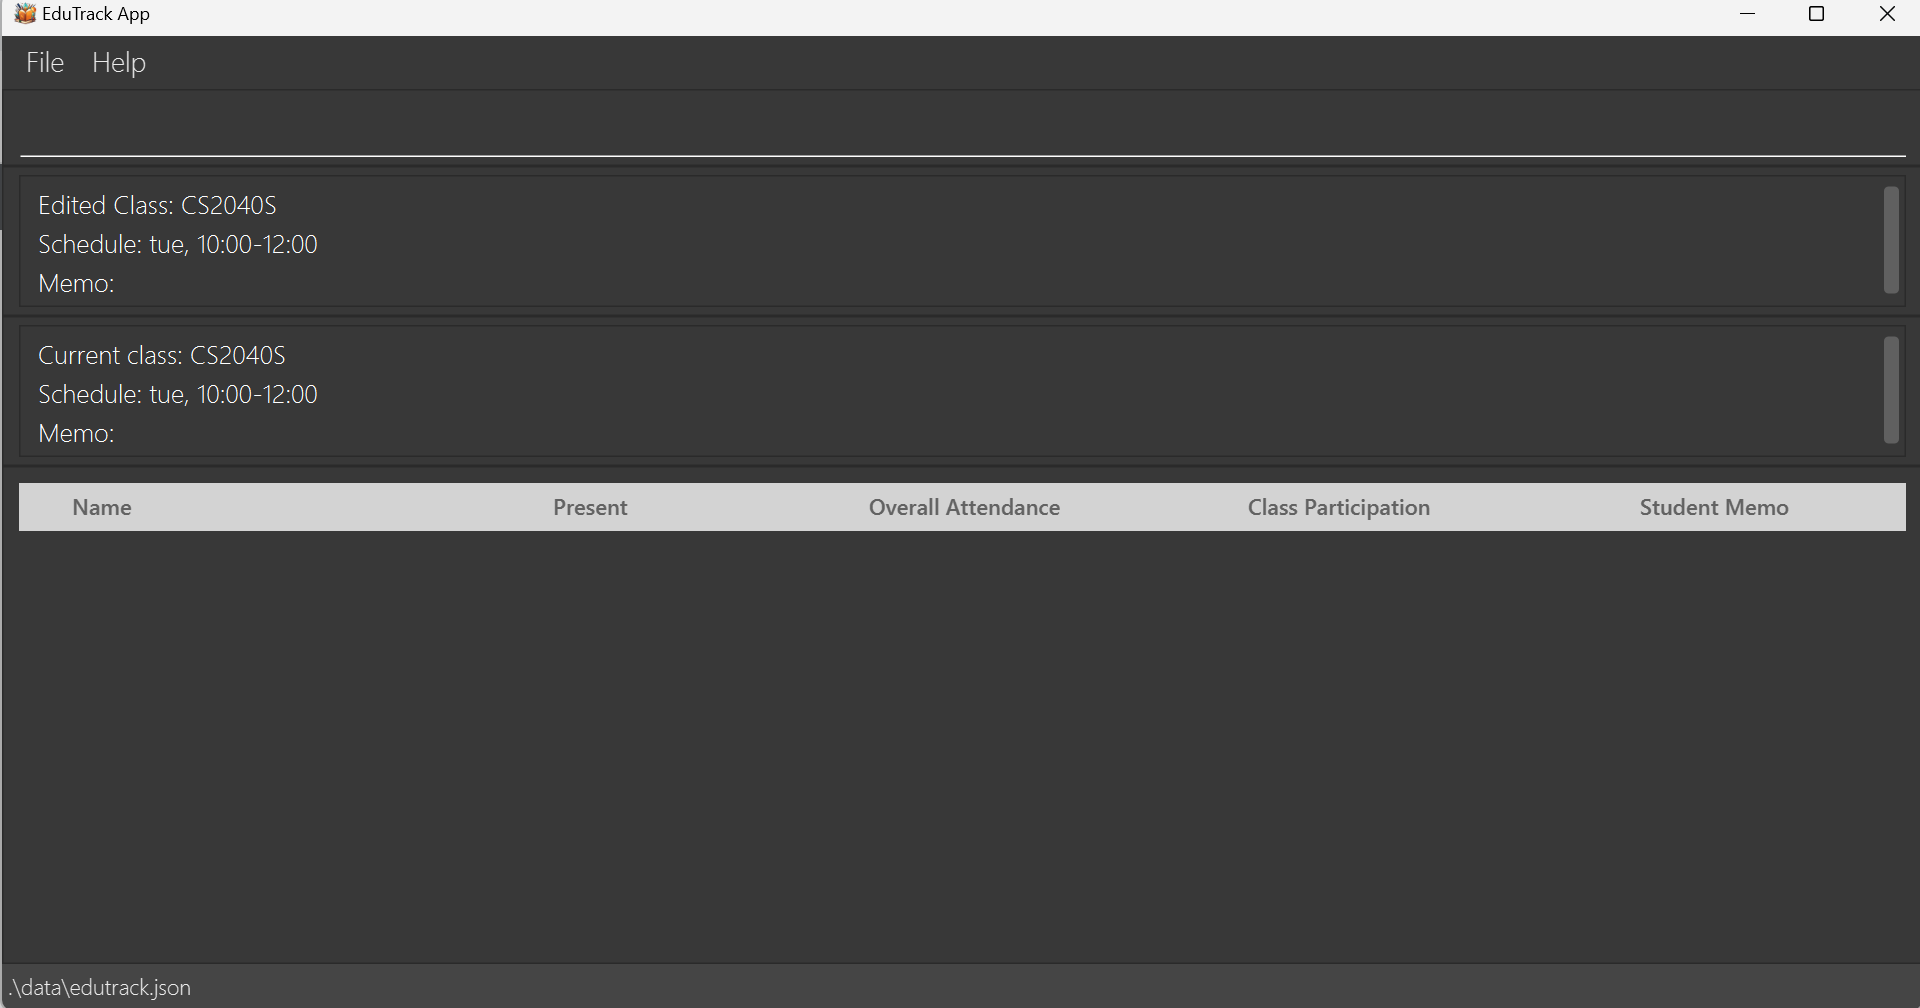
- You have successfully edited the name of your class. 🎉
Information:
- You must specify at least one parameter of the following:
/n,/m,/t. - For each parameter specified, existing values will be updated to the input values.
Caution:
- The class to be edited must already exist.
- When editing the name of your class, ensure that the provided
CLASS_NAMEis unique.
Tip:
- To delete the memo or schedule of your class, you can type
/mor/twithout specifying anything after it.
Starting a lesson : startlesson /c
Starts a lesson of your chosen class and enables you to start attendance taking.
Command Format: startlesson /c CLASS_NAME
Example:
startlesson /c CS2103T: Increases the total number of lessons conducted for class "CS2103T" by 1 and marks all the students in "CS2103T" as absent for attendance taking.
Sample Usage:
Assuming you want to start a lesson for your "CS2103T" class, and the class index in the displayed list is "1".
Enter the following command:
startlesson /c CS2103T
- You can enter
view /c 1to see what your original class looks like, as shown below:
- The result box will display the following message:
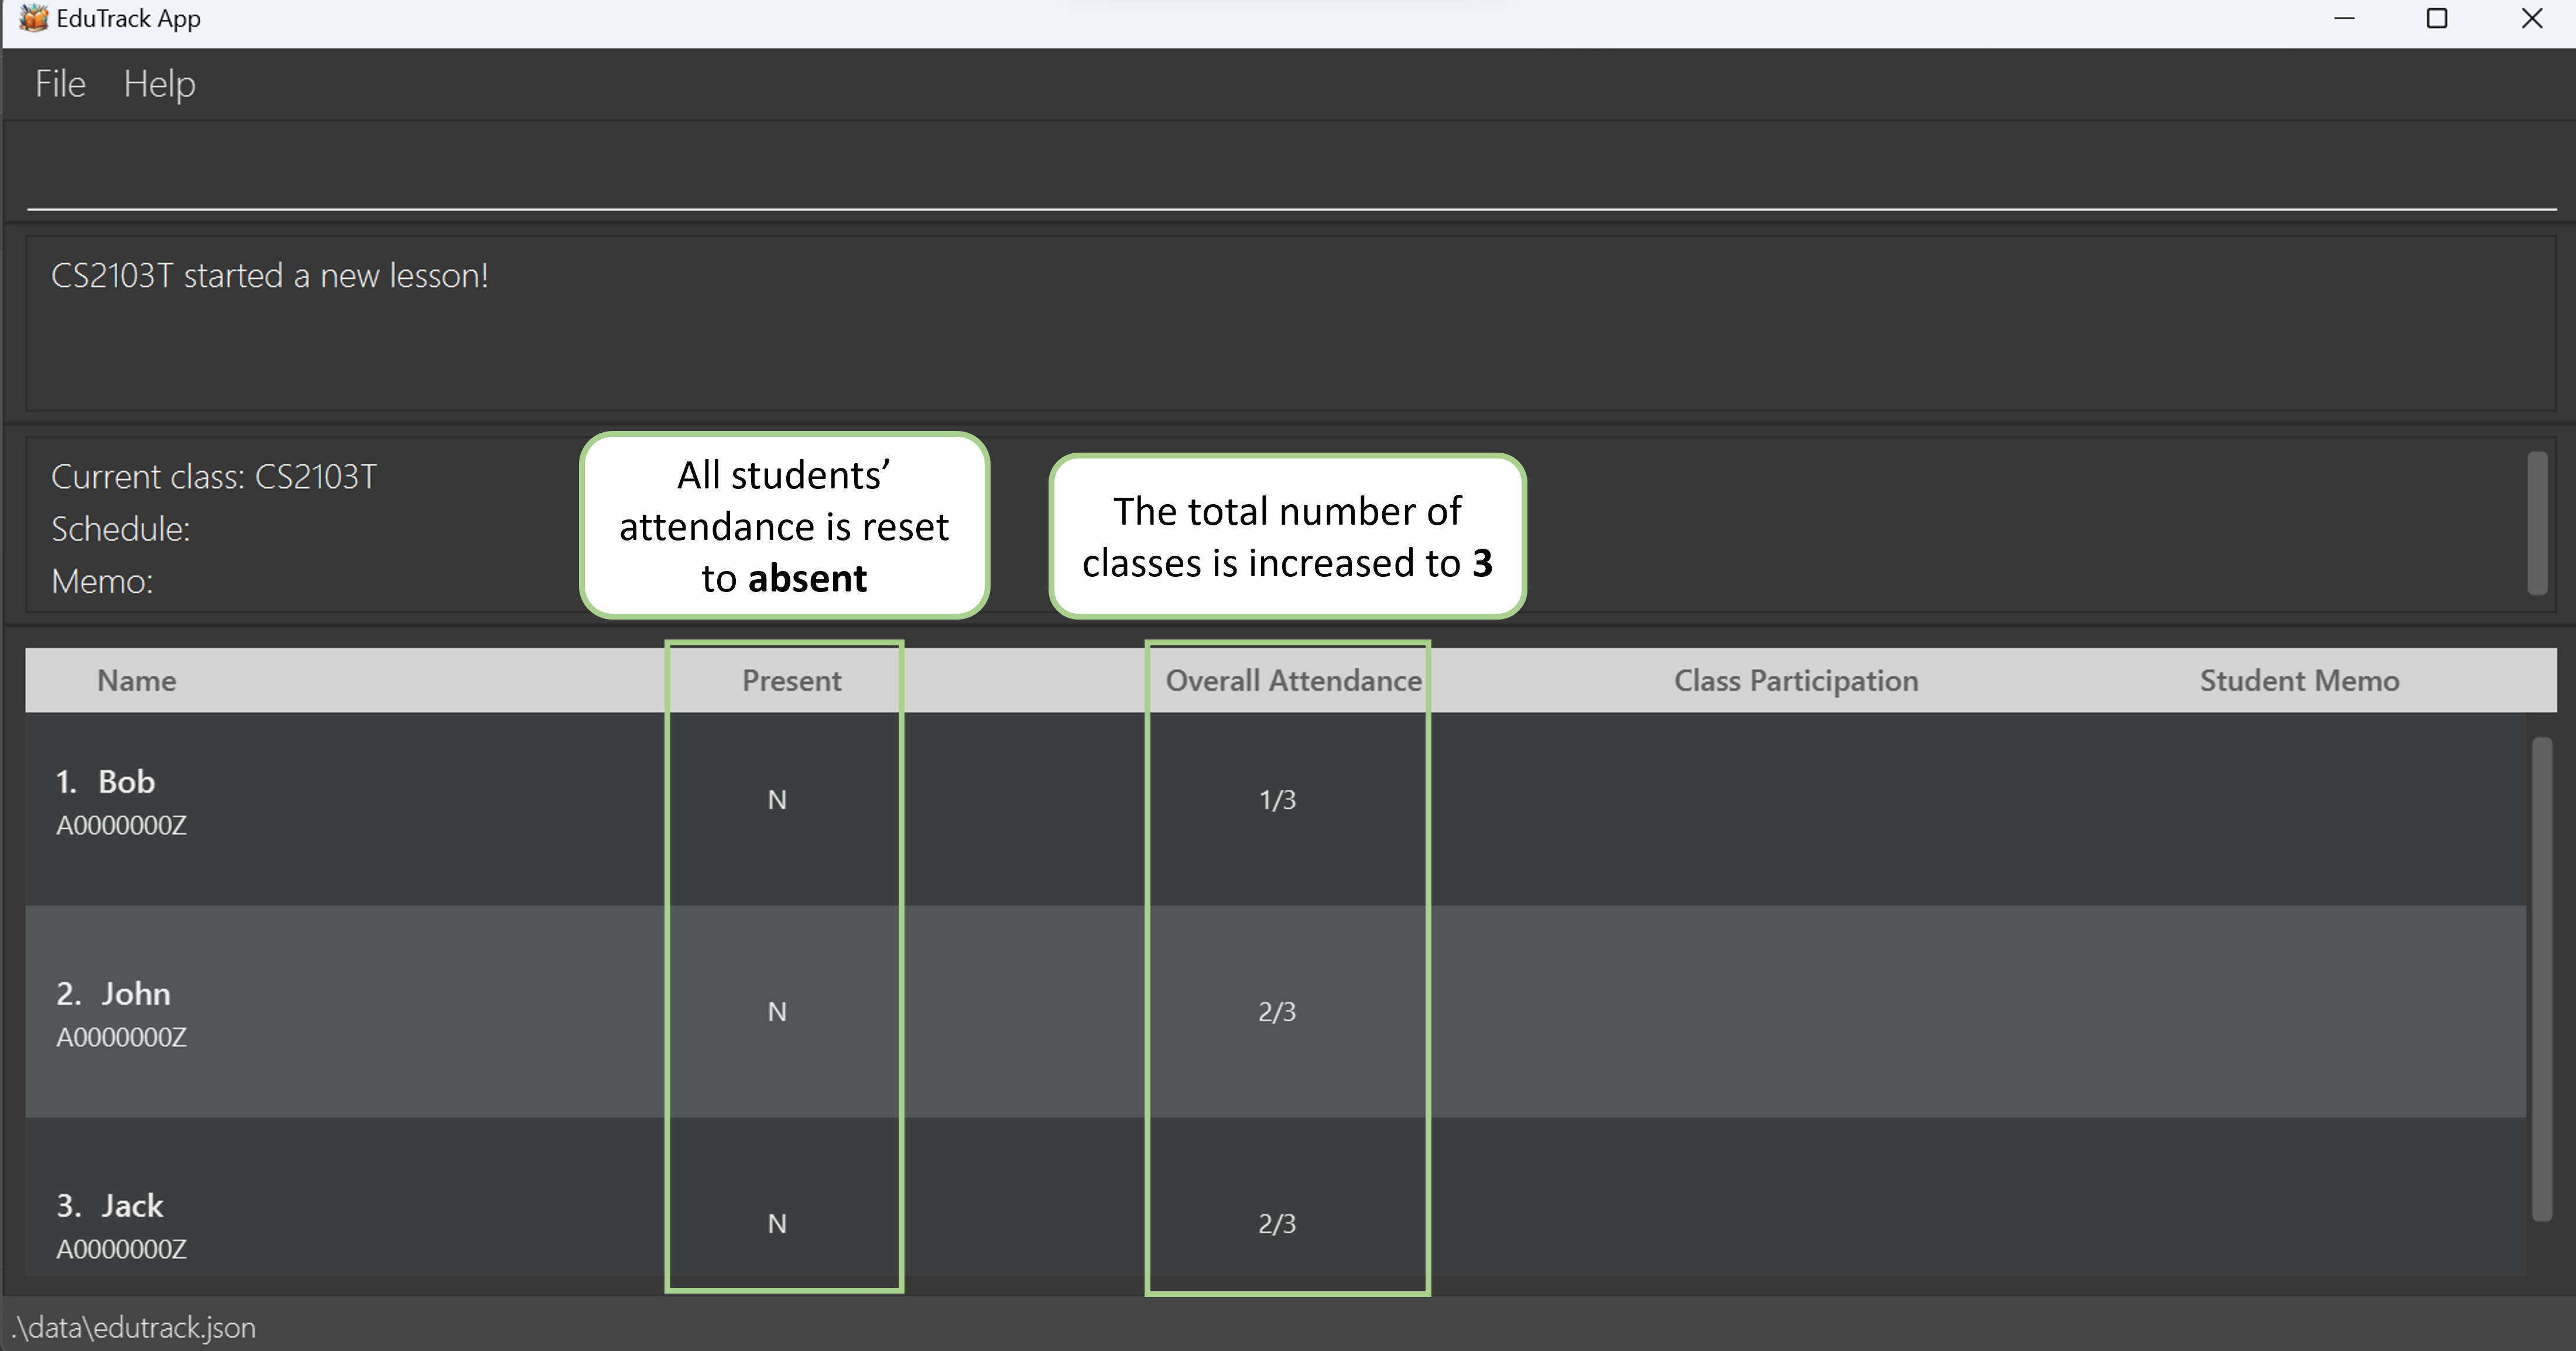
- You have successfully started a lesson in "CS2103T". 🎉
Information:
- Class must already exist
- The update of class records consists of increasing the number of lessons conducted in your class by 1 and marking all your students as absent to facilitate attendance marking.
Tip:
- You might find it helpful to use this command at the beginning of your class.
- If you started a lesson by accident, you can manually set the number of lessons back.
Setting the number of lessons of a class : setlesson /c
Sets the total number of lessons conducted for your chosen class manually.
Command Format: setlesson /c CLASS_NAME /l NUMBER_OF_LESSONS
Examples:
setlesson /c CS2103T /l 10: Sets the total number of lessons of class "CS2103T" to "10".setlesson /c CS2103T /l 0: Sets the total number of lessons of class "CS2103T" to "0".
Sample Usage:
Assuming you want to set the number of lessons conducted for your class "CS2103T" to "5".
Enter the following command:
setlesson /c CS2103T /l 5
- The result box will display the following message:
Successfully set the number of lessons in CS2103T to 5!
- You have successfully set the total number of lessons in "CS2103T" to "5". 🎉
Information:
- If one of your student's number of lessons attended exceeds the
NUMBER_OF_LESSONS, it is automatically reduced toNUMBER_OF_LESSONS.- Example: John's current attendance in "CS2103T" is 5/7.
If you enter the commandsetlesson /c CS2103T /l 3, it will adjust John's attendance to 3/3.
- Example: John's current attendance in "CS2103T" is 5/7.
Tip:
- You might find this command useful when you accidentally start a lesson and need to revert the number of lesson(s).
⬆️ Return to Table of Contents
Student commands 🎓
Adding a student : add /s
Adds a new student to your existing class.
Command Format: add /s STUDENT_NAME /c CLASS_INDEX
Examples:
add /s John /c 1: Adds a new student named "John" into the first class on the displayed class list.add /s Bob /c 2: Adds a new student named "Bob" into the second class on the displayed class list.
Sample Usage:
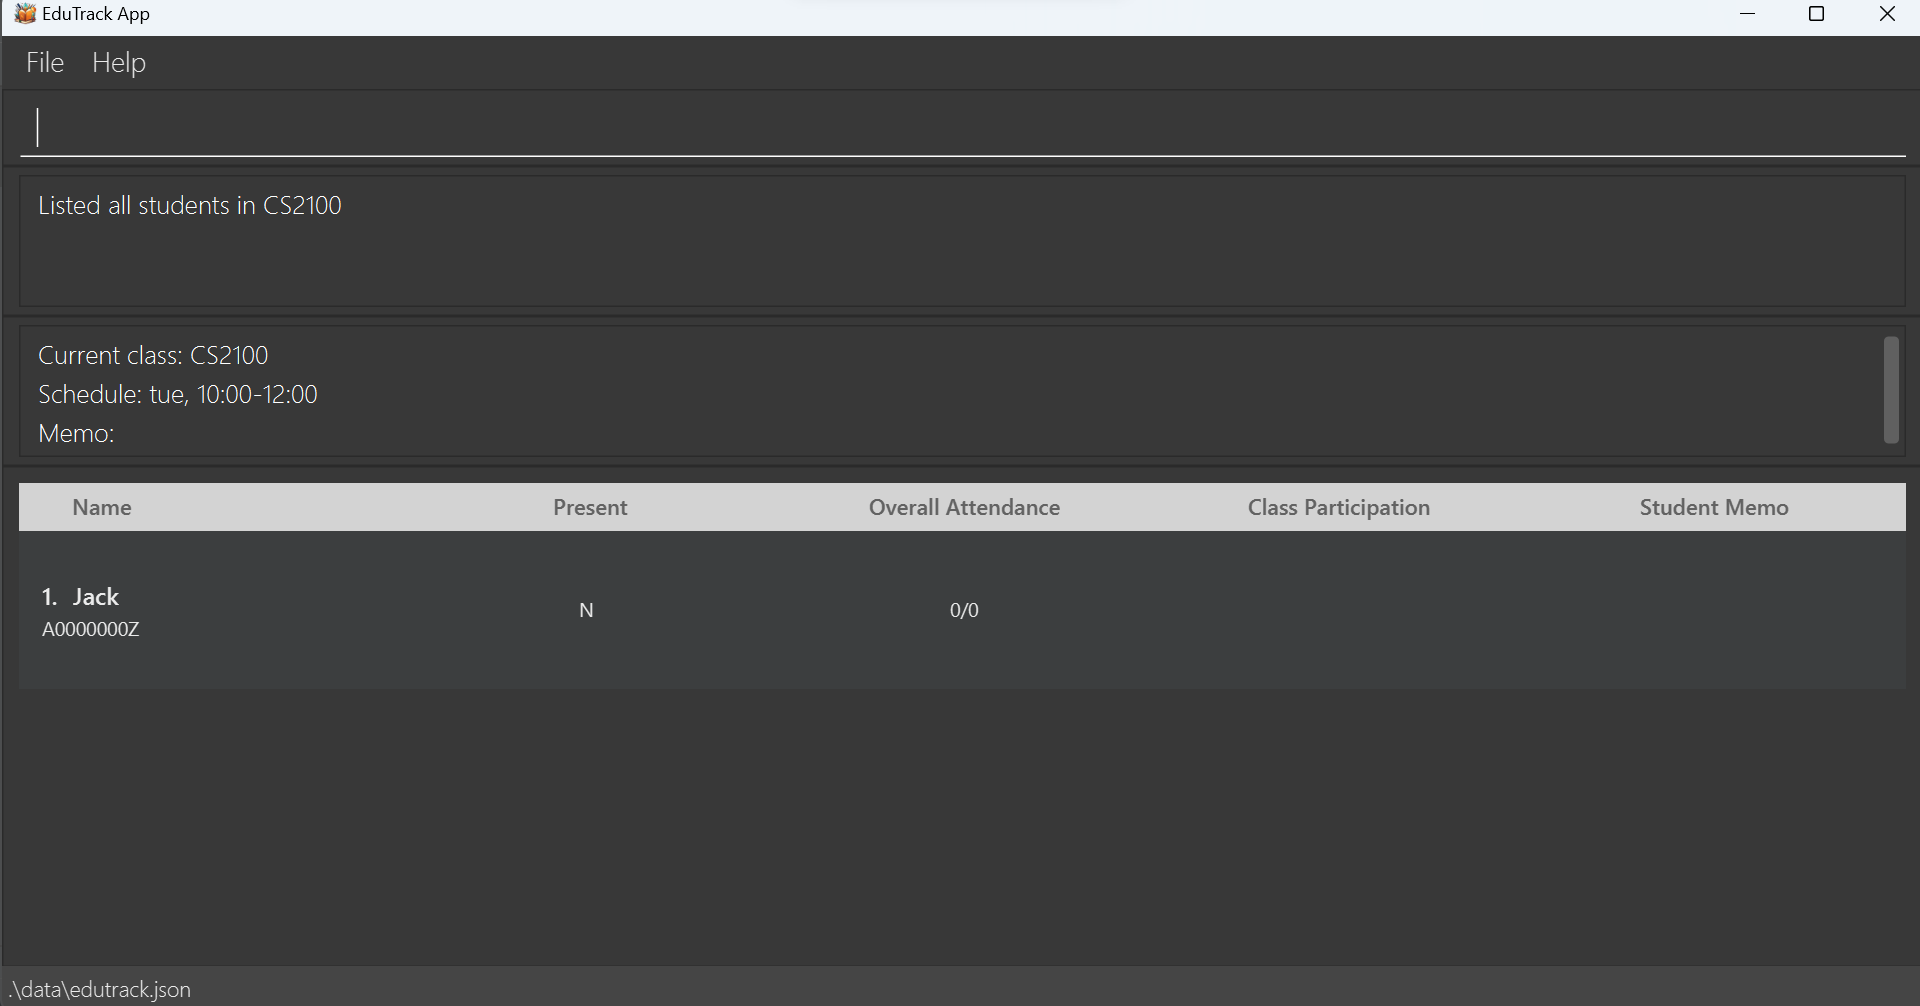
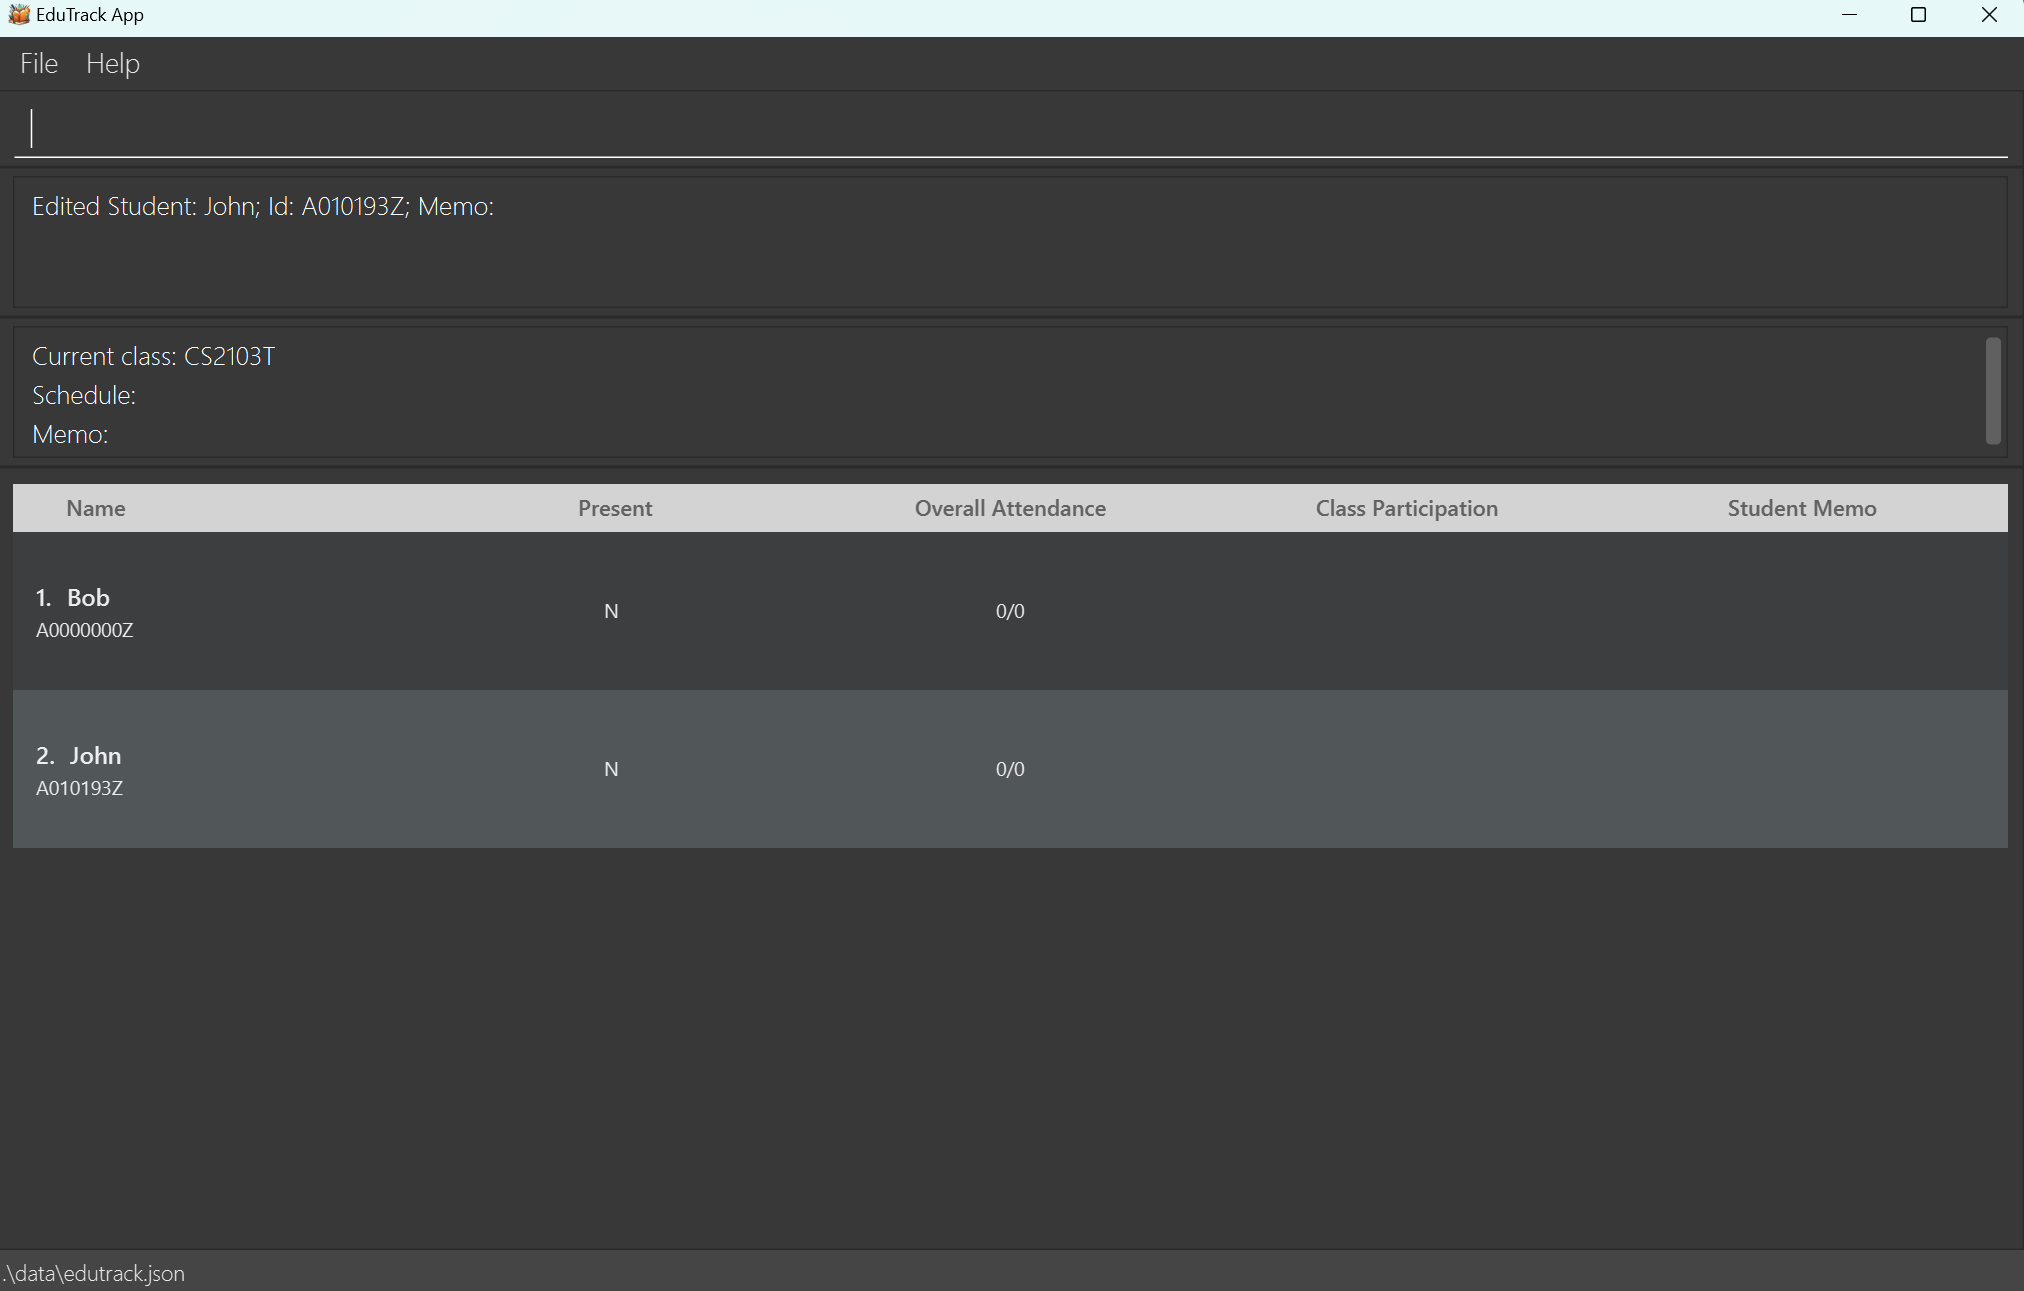
- Assuming you want to add a student named "John" into the class "CS2103T", and the class index in the displayed list is "1".
- Enter the following commands:
list
add /s John /c 1
- The result box will display the following message:
Added New Student: John; Id: A0000000Z; Memo: to the class: CS2103T
- You have successfully added the "John" into "CS2103T". 🎉
Information:
- Every student must be assigned to a class, i.e. a student should always appear in one of the classes.
- A default id "A0000000Z" will be assigned to the student.
- An identical student (ie. all student information are the same) cannot be in more than one class at the same time.
- These include the student's name, id, memo, participation, current attendance, and total attendance.
Caution:
- The class to add the student into must already exist.
- After adding the student, the GUI will update to show you the student list of the class which you added the new student into.
Tip:
- You can edit the student's id using the edit student command once you have added the student!
- You can also add the memo or class participation for a particular student using the same edit student command!
Removing a student : remove /s
Removes a student in your chosen class.
Command Format: remove /s STUDENT_INDEX /c CLASS_NAME
Examples:
remove /s 1 /c CS2103T: Removes the first student in the class named "CS2103T".remove /s 2 /c CS2100: Removes the second student in the class named "CS2100".
Sample Usage:
- You want to remove a student named "John" and he is the second student in the class named "CS2103T".
- Enter the following command:
remove /s 2 /c CS2103T
- The result box will display the following message:
John has been removed from CS2103T
- You have successfully removed "John" from "CS2103T". 🎉
Information:
- You can identify the
STUDENT_INDEXof a student by using the viewing a class command.
Editing a student : edit /s
Edits an existing student from your specified class. You can edit your student's name, memo and participation. This will help to keep your student records up-to-date.
Command Format: edit /s STUDENT_INDEX /c CLASS_NAME [/n STUDENT_NAME] [/id ID] [/m MEMO] [/p PARTICIPATION]
Examples:
edit /s 1 /c CS2103T /n Bob: Edits the name of the first student in the class "CS2103T" to "Bob".edit /s 2 /c CS2103T /id A0231234U: Edits the id of the second student in the class "CS2103T" to "A0231234U".
Sample Usage:
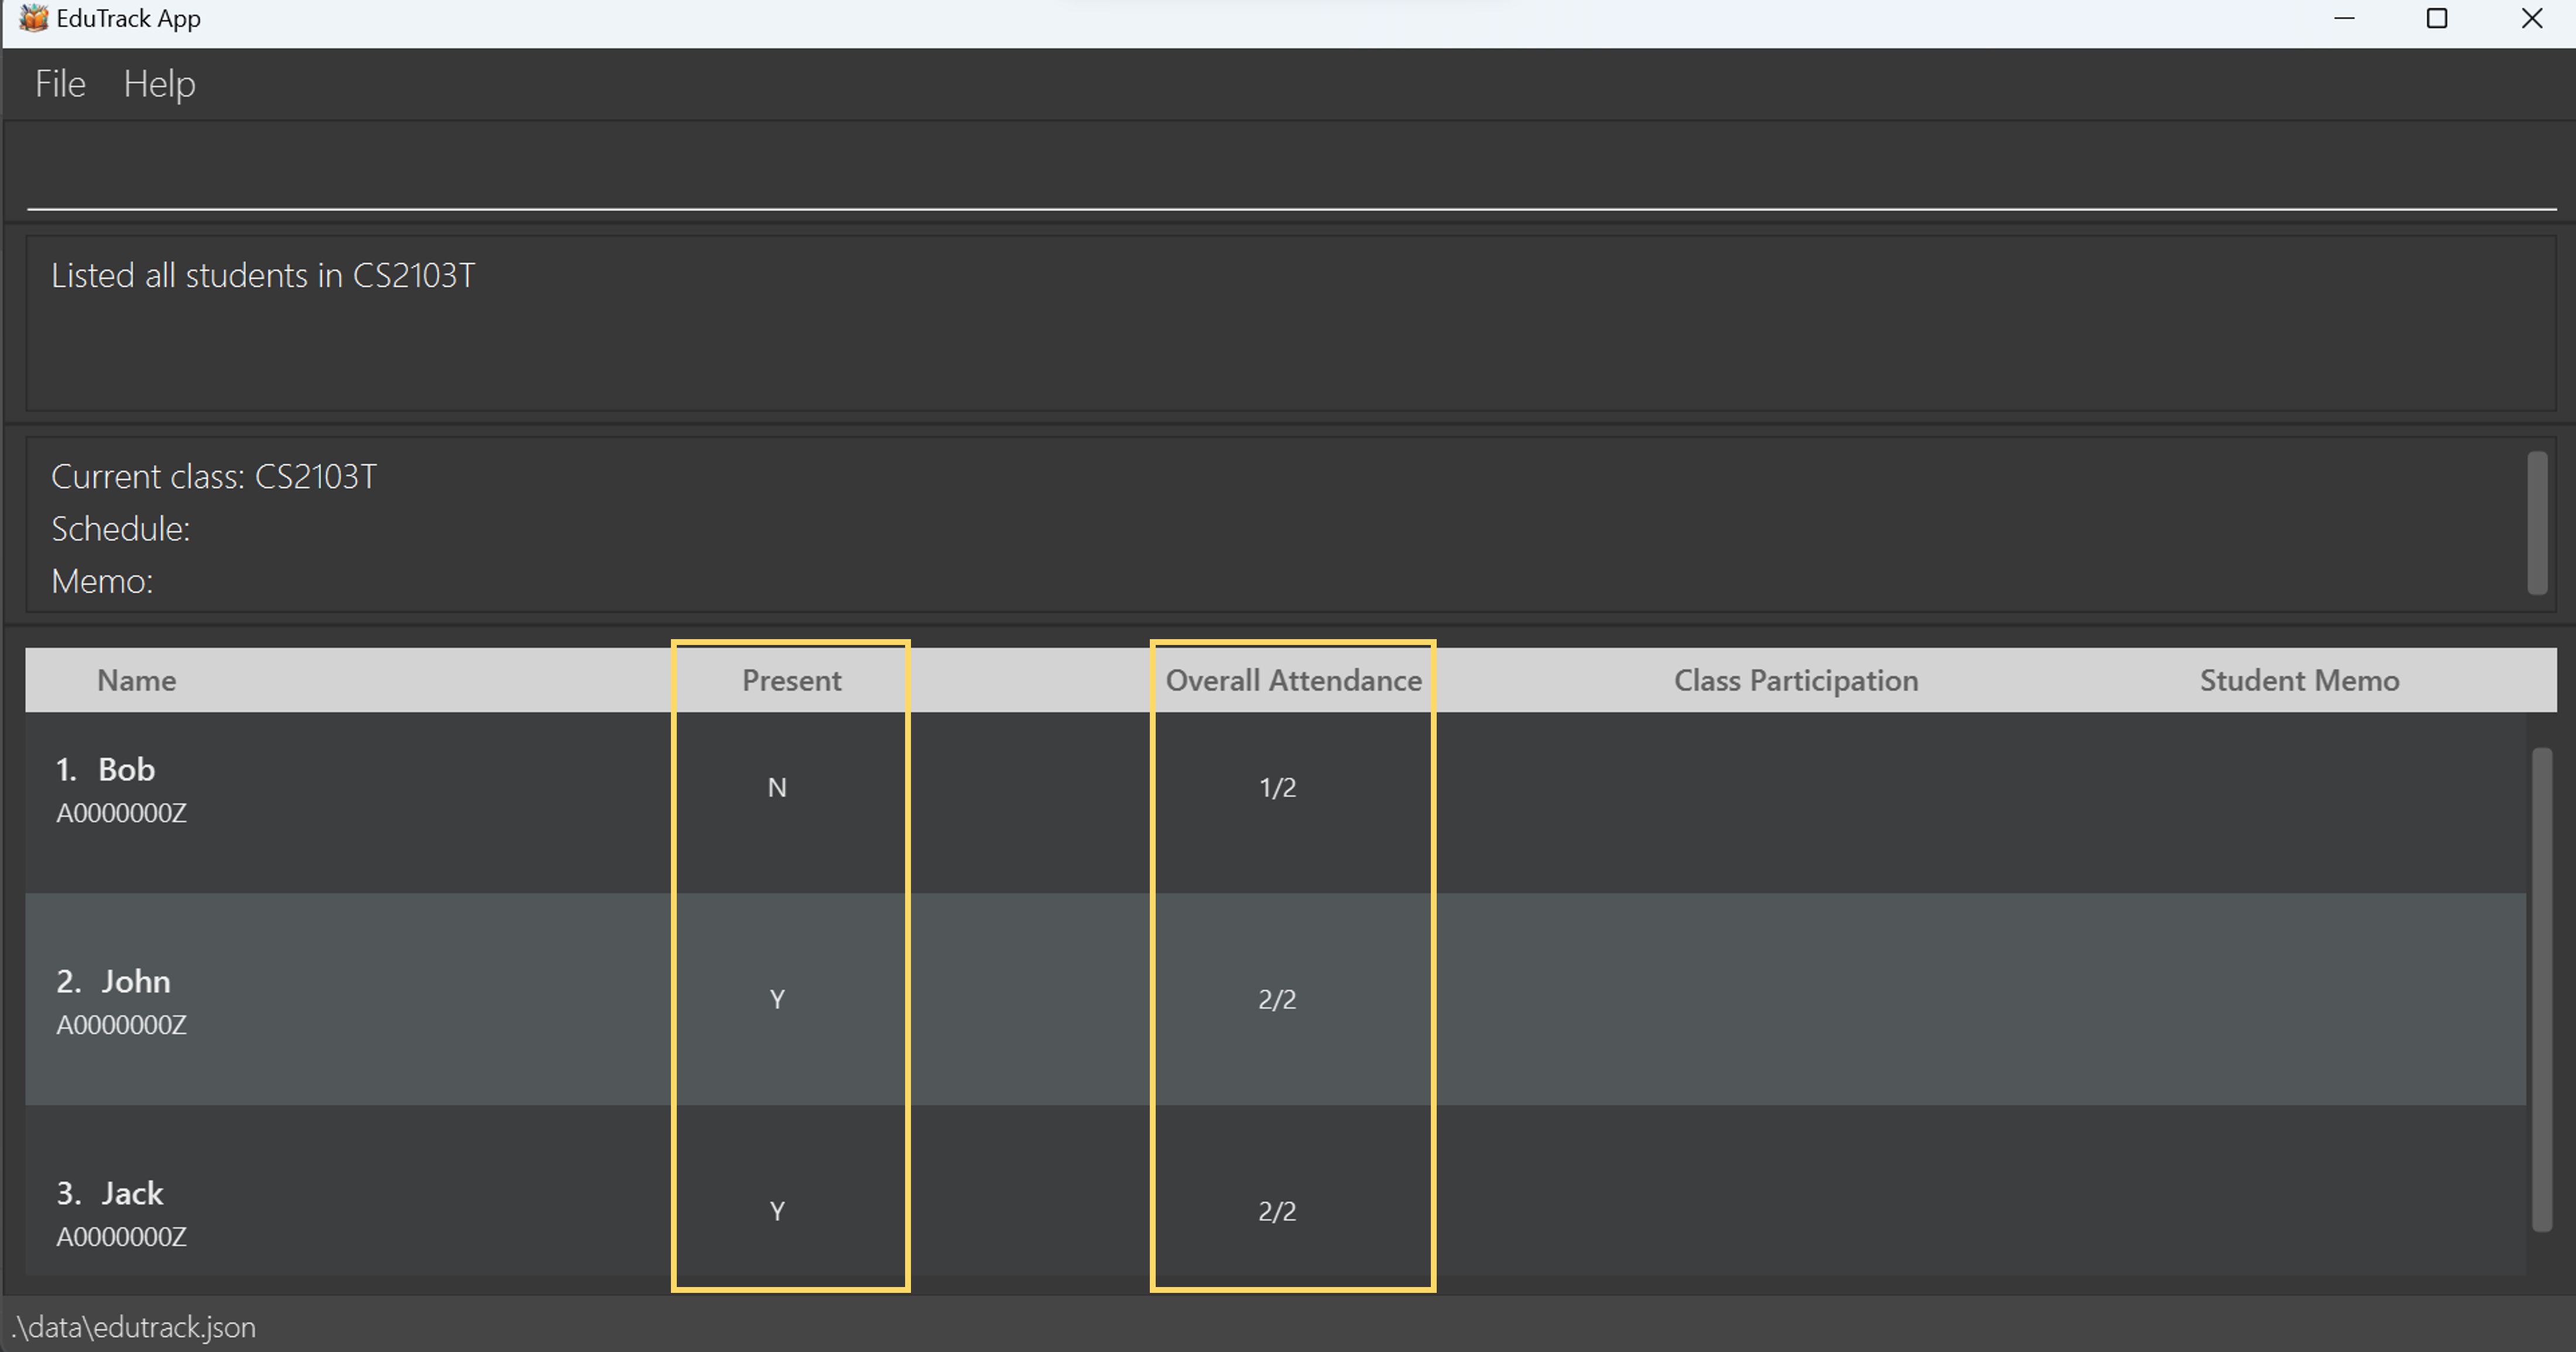
- Assuming you want to edit the id of the second student to "A010193Z", who is from "CS2103T" class, and the class index in the displayed list is "1".
- Enter the following commands:
view /c 1
edit /s 2 /c CS2103T /id A010193Z
- The result box will display the following message:
- You have successfully edited your student's details. 🎉
Information:
- Edits the student at the specified
STUDENT_INDEXin the specifiedCLASS_NAME. - At least one of the optional fields must be provided.
- Existing values will be updated to the input values. This means you can use the command to remove a student's memo or student's participation!
Caution:
- Only valid ids will be recognised. It has to start with "A", followed by only numerical characters (0-9), and end with a single capitalized alphabet (A-Z).
- After editing the student, the GUI will update to show you the student list of the class that the edited student is in.
- Be careful of any unintended edits that might lead to unwanted results (eg. 2 students with the same name) as they will not be counted as identical students as mentioned in the
Adding a student feature.
Marking a student present : mark /s
Marks a student present from your current lesson.
Command Format: mark /s STUDENT_INDEX /c CLASS_NAME
Examples:
mark /s 2 /c CS2103T: Marks the second student in your class "CS2103T" as present.mark /s 3 /c CS2102: Marks the third student in your class "CS2102" as present.
Sample Usage:
- Assuming you want to mark the second student named "Jamie" in your class "CS2103T", whereby the class is positioned at index "1" in your class list, as present.
- Enter the following commands:
view /c 1
mark /s 2 /c CS2103T
- The result box will display the following message:
Jamie successfully marked present!
- Below is a sample of the resulting outcome of the command:
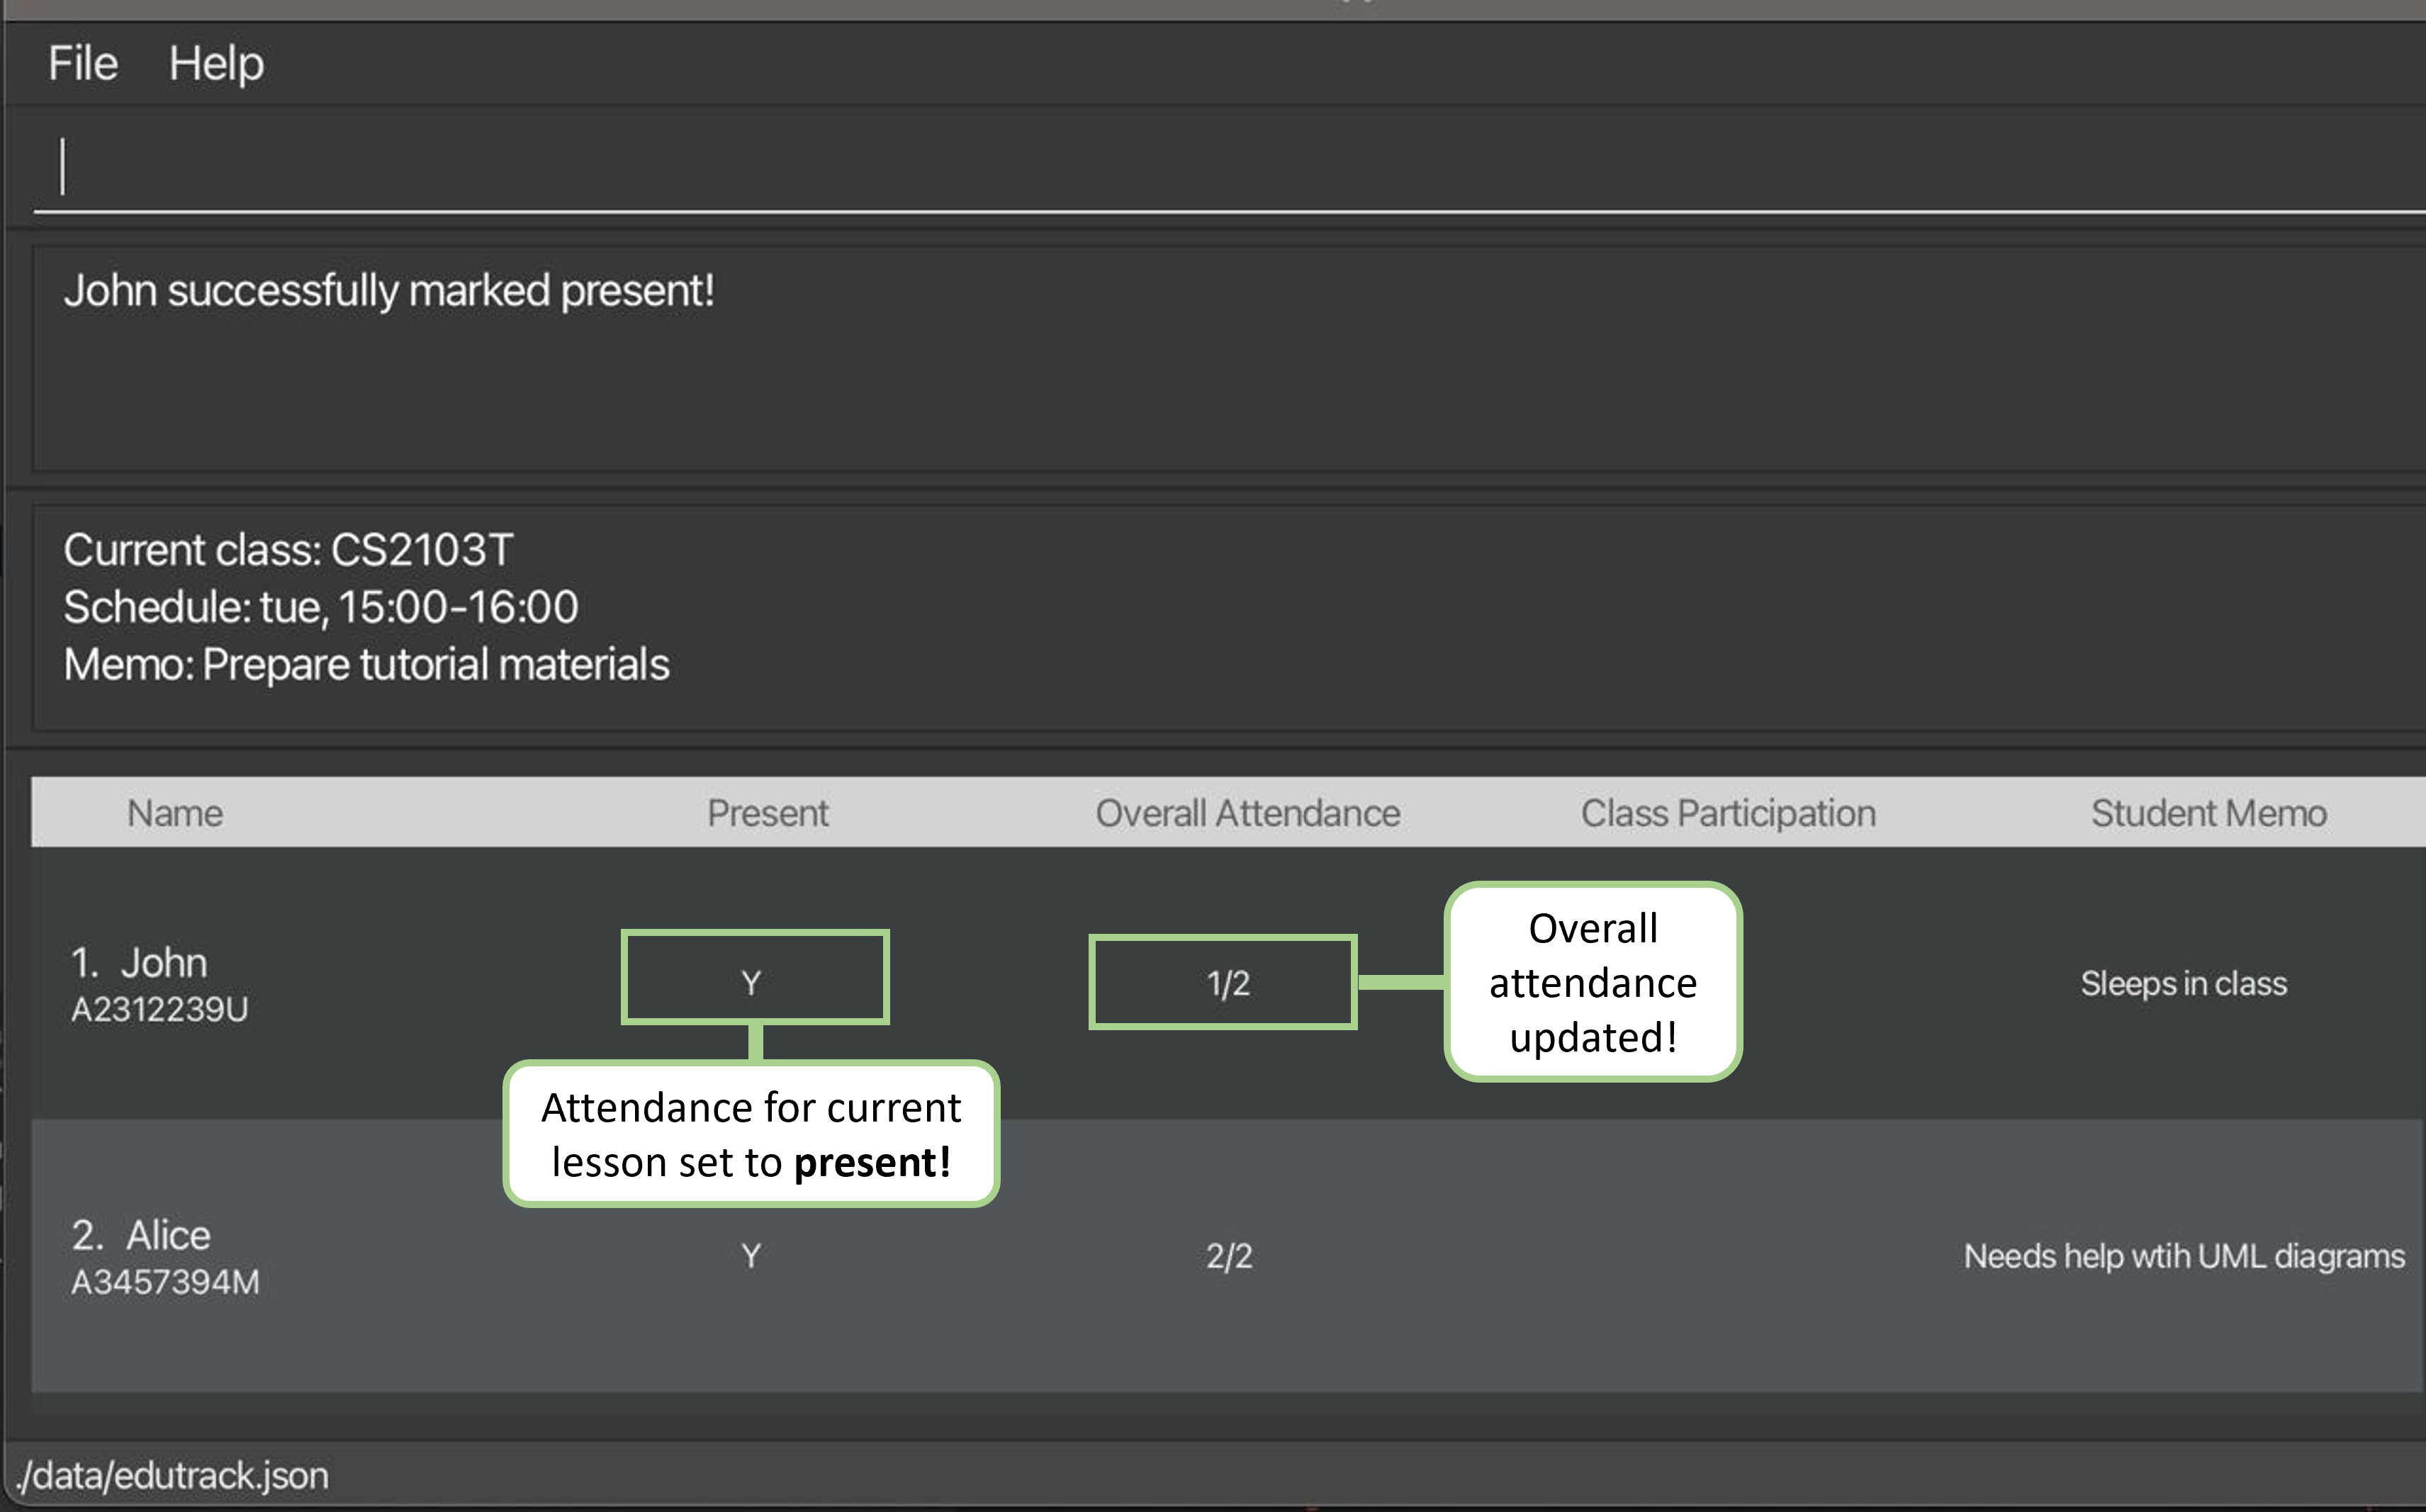
- You have successfully marked "Jamie" as present in "CS2103T". 🎉
Information:
CLASS_NAMEmust be the name of a class that already exists.
Caution:
- Your target student should not already be marked present.
Tip:
- If all your students are present, you can use our markall command instead!
Marking a student absent : unmark /s
Marks a student absent from your current lesson.
Command Format: unmark /s STUDENT_INDEX /c CLASS_NAME
Examples:
unmark /s 2 /c CS2103T: Marks the second student in your class "CS2103T" as absent.unmark /s 3 /c CS2102: Marks the third student in your class "CS2102" as absent.
Sample Usage:
- Assuming you want to mark the second student named "Jamie" in your class "CS2103T", whereby the class is positioned at index "1" in your class list, as absent.
- Enter the following commands:
view /c 1
mark /s 2 /c CS2103T
- The result box will display the following message:
Jamie has been marked absent!
- Below is a sample of the result outcome:
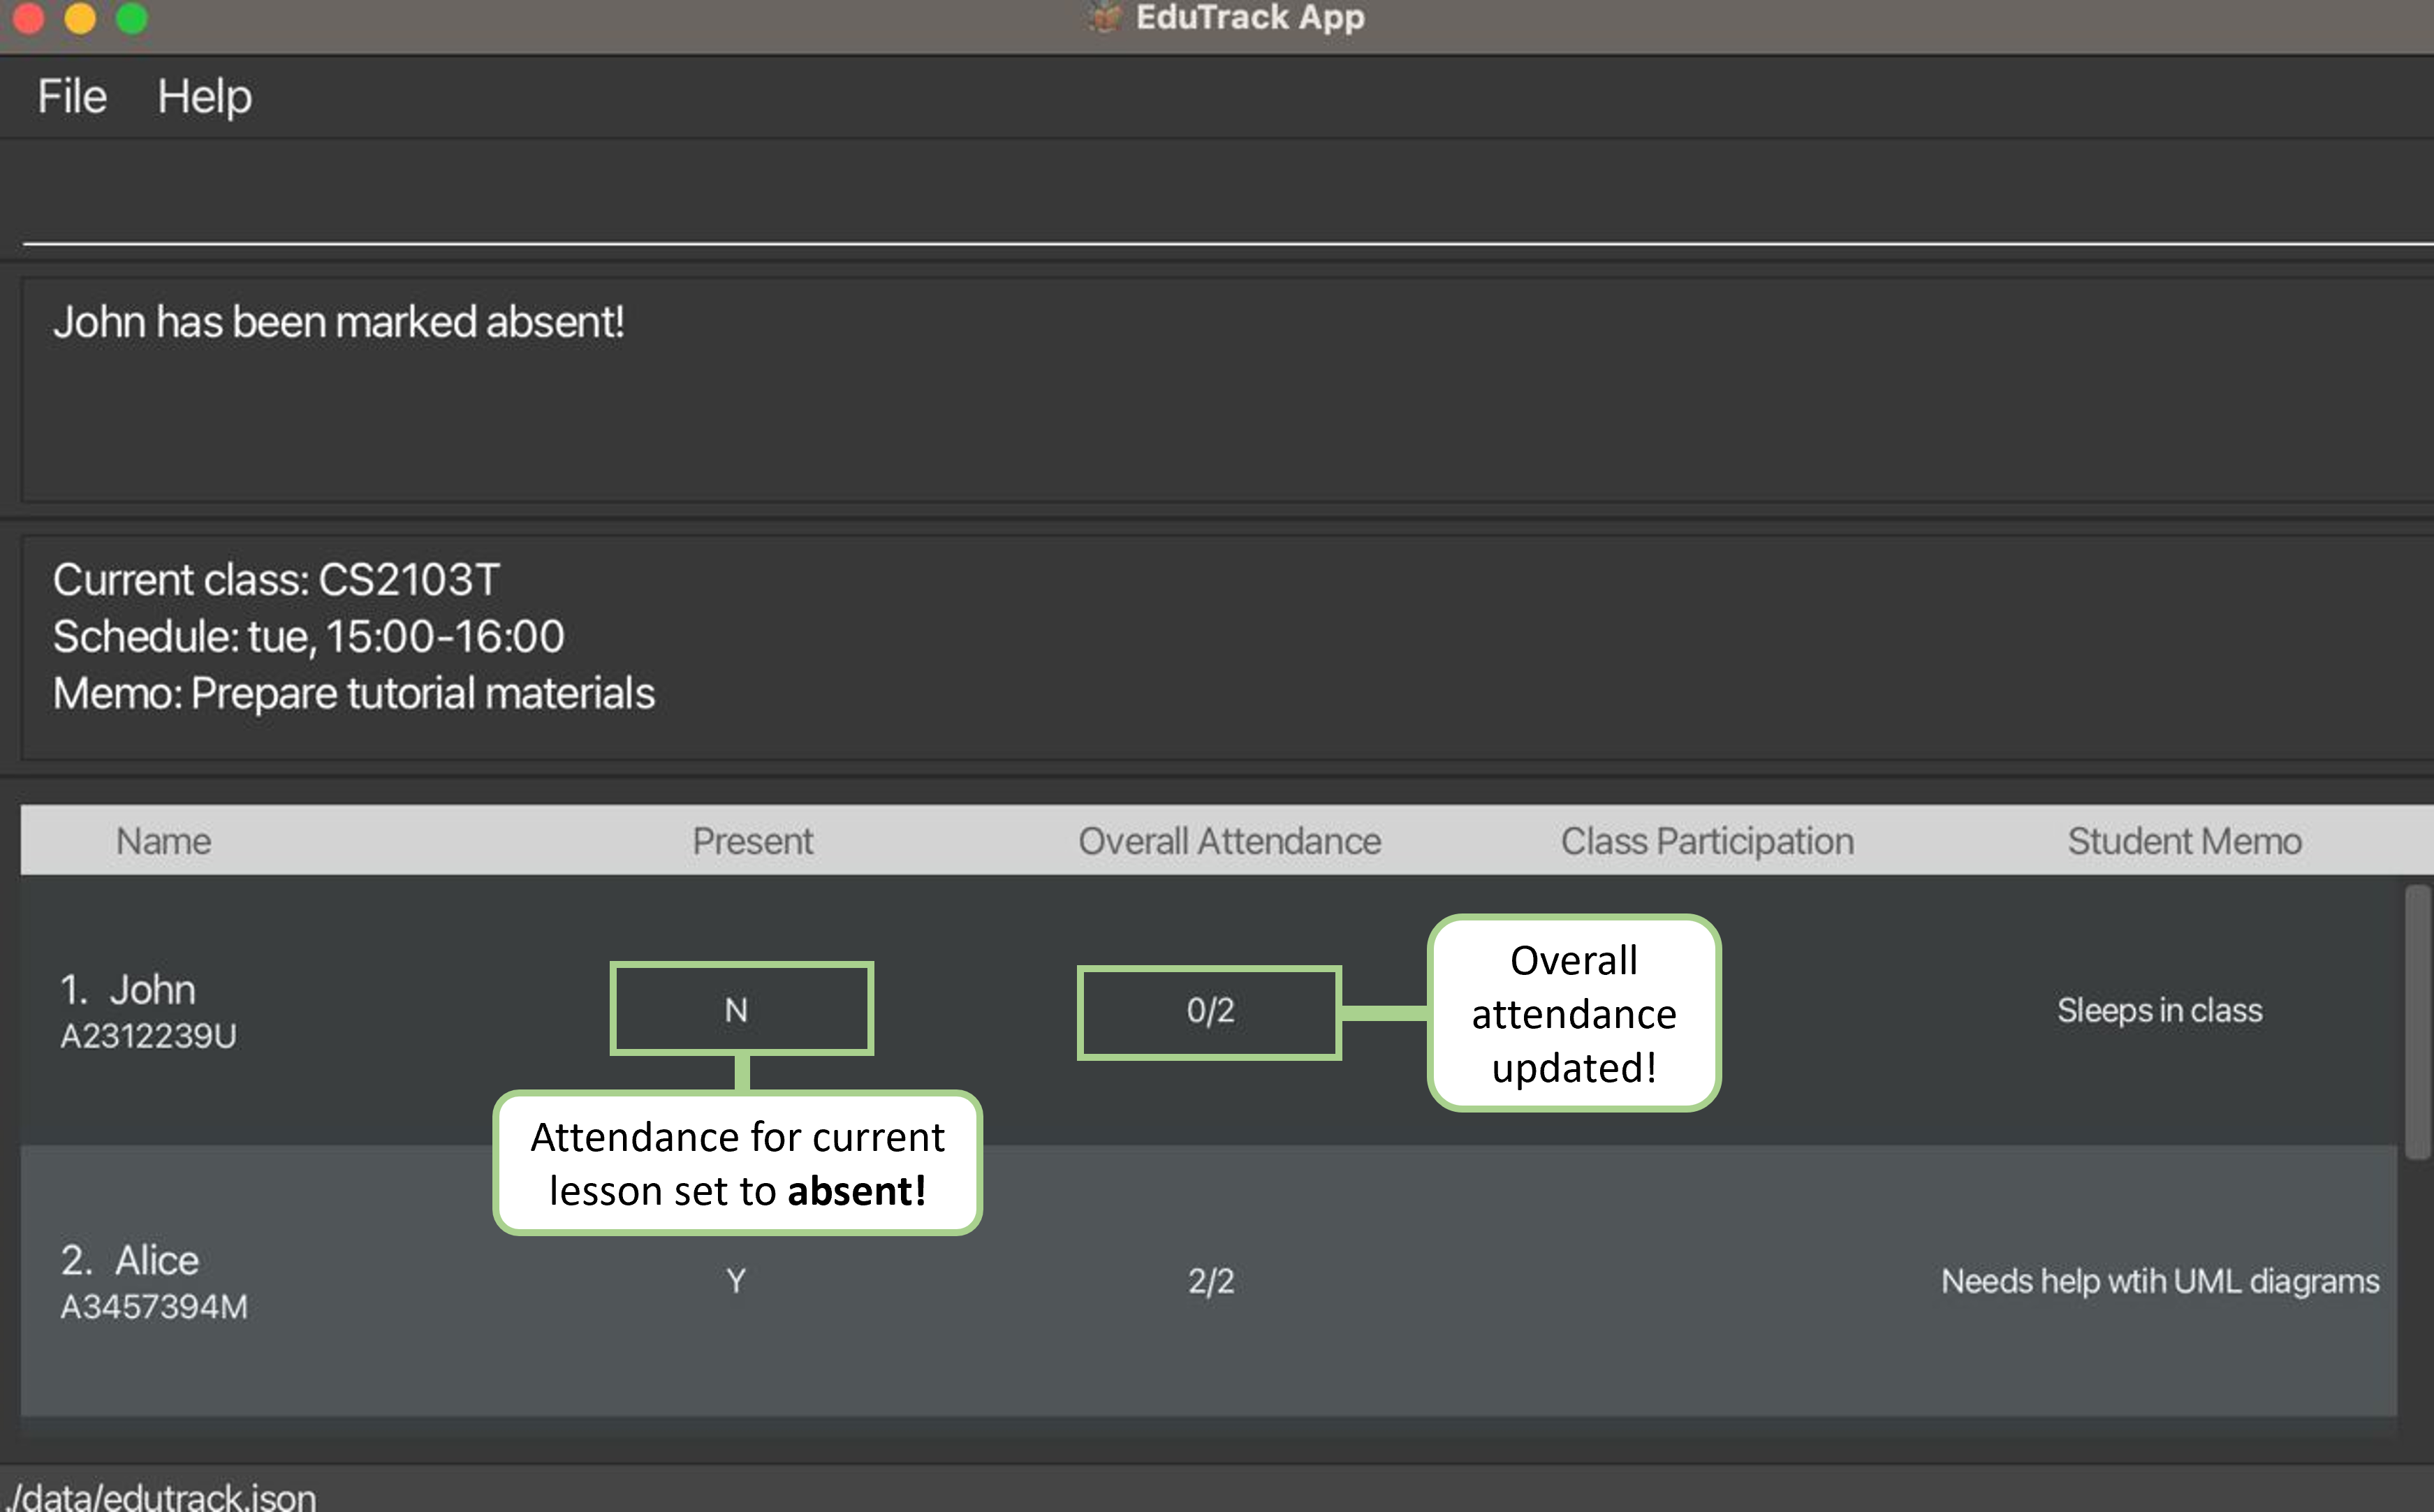
- You have successfully marked "Jamie" as absent in "CS2103T". 🎉
Information:
CLASS_NAMEmust be the name of a class that already exists.
Caution:
- Your target student should not already be marked absent.
Marking all students in a class present : markall /c
Marks all the students in your class as present. You can use this command if all your students are present for your current lesson.
Command Format: markall /c CLASS_INDEX
Examples:
markall /c 1: Marks all the students in your first class in the class list as present.markall /c 2: Marks all the students in your second class in the class list as present.
Sample Usage:
- Assuming you want to mark all the students in your class named "CS2103T", whereby the class is positioned at index "1" in your class list, as present.
- Enter the following commands:
view /c 1
markall /c 1
- The result box will display the following message:
Successfully marked all students in CS2103T!
- You have successfully marked all the students in "CS2103T" as present. 🎉
Information:
- Students who have already been marked present will not be affected by this command.
Tip:
- You can use
markallin conjunction withunmarkif most of your students are present, you can save more time doing it this way.
Marking all students in a class absent : unmarkall /c
Marks all students in your class as absent. You can use this command if all your students are absent for your current lesson.
Command Format: unmarkall /c CLASS_INDEX
Examples:
unmarkall /c 1: Marks all the students in your first class in the class list as absent.unmarkall /c 2: Marks all the students in your second class in the class list as absent.
Sample Usage:
- Assuming you want to mark all the students in your class named "CS2103T", whereby the class is positioned at index "1" in your class list, as absent.
- Enter the following commands:
view /c 1
unmarkall /c 1
- The result box will display the following message:
Successfully unmarked all students in CS2103T!
- Successfully unmarked all students in "CS2103T"! 🎉
Information:
- Students who have already been marked absent will not be affected by this command.
⬆️ Return to Table of Contents
Miscellaneous commands 🛠️
Viewing help : help
Displays a pop-up window containing the link to this user guide. You can use this command to quickly access the user guide.
Command Format: help
Information:
You will see the following box once you have successfully executed the command:

To read the user guide, you can click on the "Copy URL" button and paste the link into your web browser.
Exiting the program : exit
Exits the application at any time you want.
Command Format: exit
Clearing all entries : clear
Removes all your entries from EduTrack when you want to start fresh.
Command Format: clear
Information:
EduTrack's GUI should look like this when you have successfully executed the command:
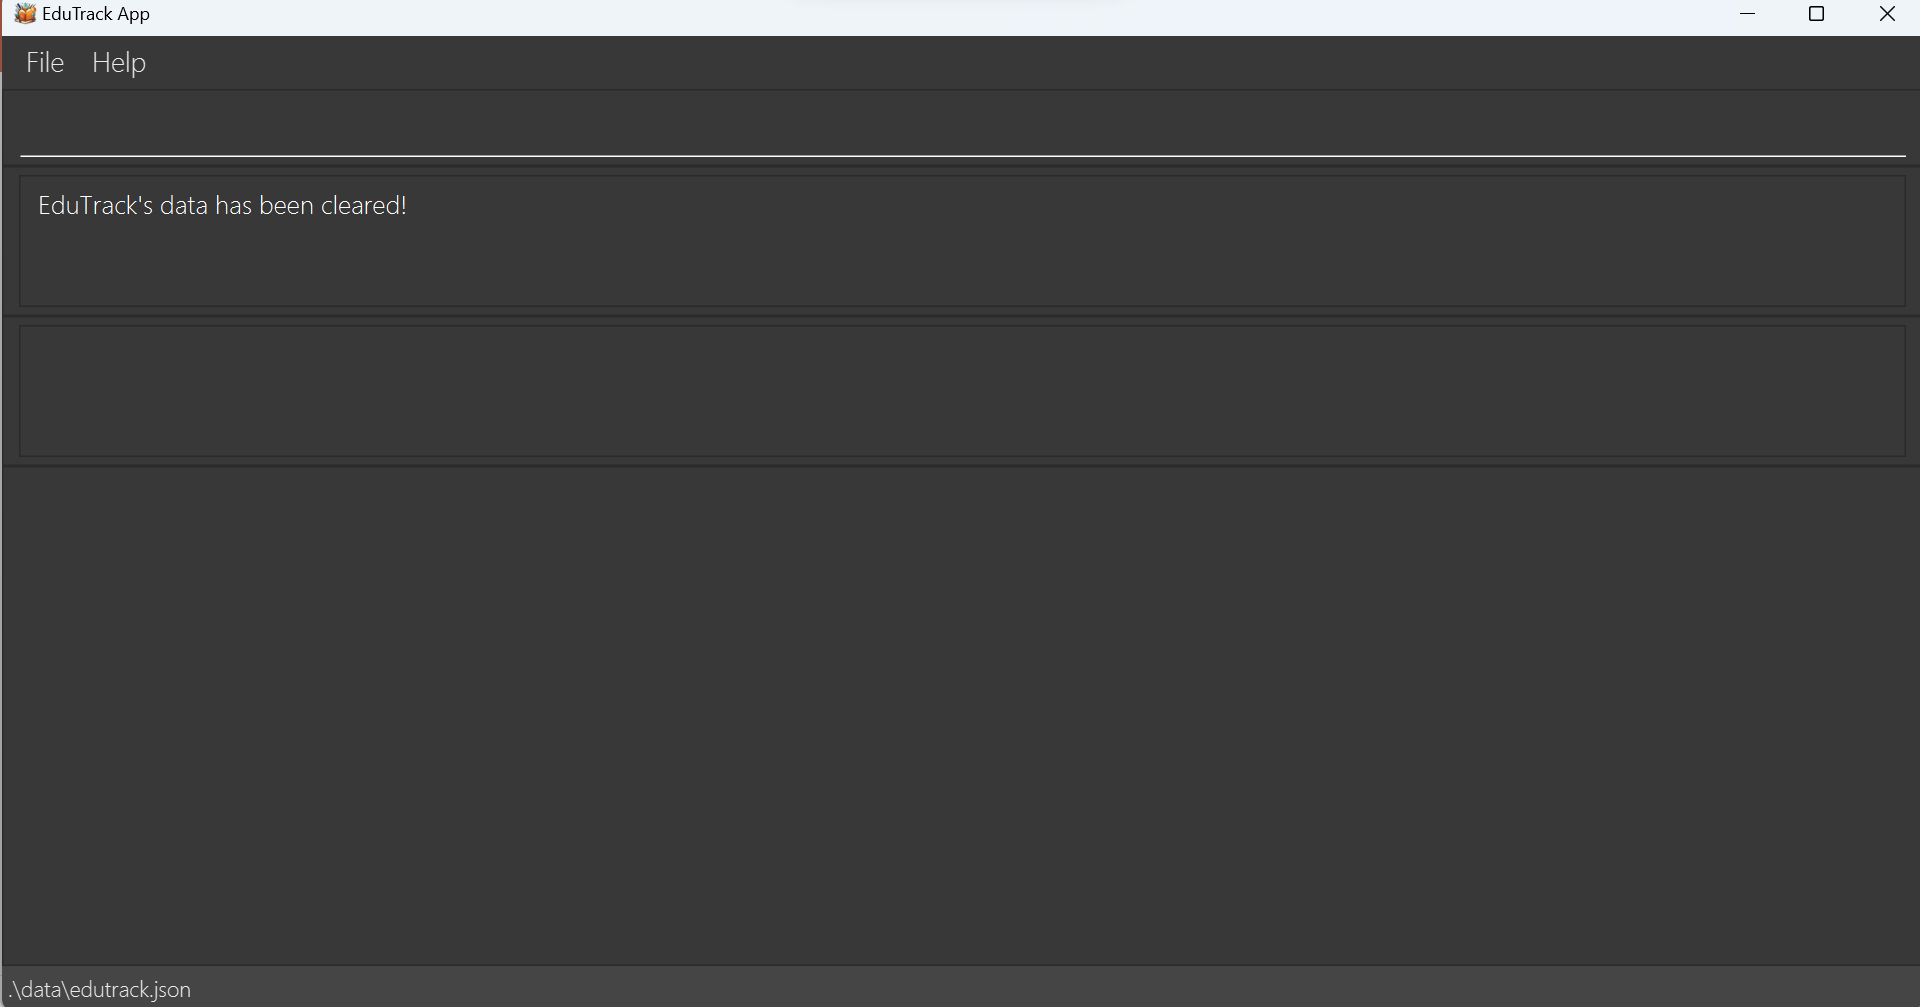
Caution:
- Please ensure to think carefully before you execute this command as the action cannot be undone.
Saving the data
EduTrack's got your back. Your data is automatically saved on your hard disk after any command that changes the data, so no need to worry about saving manually.
⬆️ Return to Table of Contents
FAQ
Q: How do I transfer my data to another computer?
A: Install the app on the other computer and overwrite the empty data file EduTrack creates, with the file
that contains the data of your previous EduTrack home folder.
Q: How do I save my data?
A: EduTrack's data is saved in the hard disk automatically after any command that changes the data.
There is no need to save manually.
Known issues
- When using multiple screens, if you move the application to a secondary screen, and later switch to using only the primary screen, the GUI will open off-screen. The remedy is to delete the
preferences.jsonfile created by the application before running the application again. - When attempting to view a long string of text, the text may be truncated with "..." at the end. The remedy is to resize the window to a larger size, if possible.
- When the window size is too small, the alignment of the columns when viewing a class may be off. The remedy is to resize the window to be larger if possible.
Command summary
| Action | Format, Examples |
|---|---|
| list | Listing all classes: Format: list |
| add | Adding a class: Format: add /c CLASS_NAME E.g: add /c CS2103T Adding a student: Format: add /s STUDENT_NAME /c CLASS_INDEX E.g: add /s John /c 3 |
| remove | Removing a class: Format: remove /c CLASS_INDEX E.g: remove /c 3 Removing a student: Format: remove /s STUDENT_INDEX /c CLASS_NAME E.g: remove /s 1 /c CS2103T |
| view | Viewing a class: Format: view /c CLASS_INDEX E.g: view /c 1 |
| edit | Editing a class: Format: edit /c CLASS_INDEX [/n CLASS_NAME] [/m MEMO] [/t SCHEDULE] E.g: edit /c 2 /m submit marking report Editing a student: Format: edit /s STUDENT_INDEX /c CLASS_NAME [/n STUDENT_NAME] [/id ID] [/m MEMO] [/p PARTICIPATION] E.g: edit /s 1 /c cs2103t /id A1234567W |
| mark | Marking a student present: Format: mark /s STUDENT_INDEX /c CLASS_NAME E.g: mark /s 1 /c CS2103T |
| unmark | Marking a student absent: Format: unmark /s STUDENT_INDEX /c CLASS_NAME E.g: unmark /s 1 /c CS2103T |
| markall | Marking all students in a class present: Format: markall /c CLASS_INDEX E.g: markall /c 1 |
| unmarkall | Marking all students in a class absent: Format: unmarkall /c CLASS_INDEX E.g: unmrkall /c 1 |
| startlesson | Starting a lesson of a class: Format: startlesson /c CLASS_NAME E.g: startlesson /c CS2103T |
| setlesson | Setting the number of lessons in a class: Format: setlesson /c CLASS_NAME /l NUMBER_OF_LESSONS E.g: setlesson /c CS2103T /l 5 |
Glossary
| Term | Definition |
|---|---|
| Command Line Interface (CLI) | Command line interface where users interact with the system by typing in commands. e.g. Terminal |
| Graphical User Interface (GUI) | Graphical user interface where users interact with the system through visual representations. e.g. Google Chrome, Spotify, Windows Desktop |
⬆️ Return to Table of Contents